

Hey everyone, I have been reading all the threads on the modding that has to be done to make everything work properly.I have the motor mounted so far but I was wondering about the sprocket adapter everyone recommends.What's it for? ...And any other tips and tricks will definitely help....Thanks
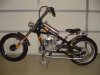
Another O.C.C build!!!
- Thread starter Decedent
- Start date

Decedent, Welcome. I Think The Sprocket Adapter You Are Referring To Is A Great One. It Is For The Rear Wheel. Made By Manic Mechanic (creative Engineering) Makes The Build Much Easier And Much Better. One Of The Best Add On Parts Available. Ron .. .. .
 Thanks for the info. I was also wondering if anybody had trouble with chain tensioner and/or chain when installing. I have the motor mounted but not fully installed and it seems I'm a little short on the chain by 3 or 4 links,So the tensioner is a whole different story. I read in the forum somewhere that there was a thread on just the OCC chopper builds,but I can't find it anywhere. If anybody can help a newbie, I'm grateful for any kind of tips.Thanks.......Decedent
Type in the search box at the top of this page, Occ chopper, Occ Stingray, Schwinn Occ Chopper . Should get a variety of info . even how much more chain you need . Thats how I got my info also if you find fellas that are discussing there occ build ,click on there name and search all their posts .
Welcome decedent, I built a schwinn occ a while back. There are a few snags you will run into. You said you have your motor mounted, did you use one of Barry's mounts or make your own?
Since the motor needs to be set off center about 3/4" it is so much easier to use one of Manic Mechanics rear sprocket adaptors. That way you can move it from side to side to get the clearance you need to clear your 4 1/4" rear tire.
Also you will have to fabricate your own exhaust or buy Barry's pipe off e-bay.
Then there is the chain tensioner issues. You will probably have to use a revised tensioner mounted on the top of your chain in the back. You will also have to modify your left rear brake pad to clear the chain unless you go to a disk brake.
They are not the most fun build, but I am fortunate to have a mini Machine Shop to build parts.
If you get stumped on somethiong feel free to shoot me a privat message. I will give you my phone number and help you with some parts.
I have another OCC bike ready for another motor, I am trying to hold off till winter.
John
Attachments
-
 573.7 KB Views: 322
I am fortunate to have access to all the tools I need for making mods.I actually based my motor mount on Barry's and your(John) designs.I have a pretty straight shot from the motor to the rear sprocket so I'm wondering if I will need that sprocket adapter that everyone recommends.I still have quite a few mods to do.I'll try to get some pics up soon.
I think some people have used the kit rag joint on the sprocket. I have heard of alot of tire rubbing issues. With Jim's you have the advantage to be able to slide it to where you want to clear the tire.
After I made my mount I drew up a print of it and it sets the motor 7/8" off center for the perfect alighnment to the rear sprocket.
John
After I made my mount I drew up a print of it and it sets the motor 7/8" off center for the perfect alighnment to the rear sprocket.
John
My thread "New OCC chopper paint" has a lot of specs and descriptions, but these guys are rocking the casbah for sure. I didn't need the sprocket adapter but it might have been easier if I had started the build with it.
Hey RETMACH where do you get that airfilter, I love the look of a lil cold air intake like filter and I want one. Size, part # anything would be helpfull.Welcome decedent, I built a schwinn occ a while back. There are a few snags you will run into. You said you have your motor mounted, did you use one of Barry's mounts or make your own?
Since the motor needs to be set off center about 3/4" it is so much easier to use one of Manic Mechanics rear sprocket adaptors. That way you can move it from side to side to get the clearance you need to clear your 4 1/4" rear tire.
Also you will have to fabricate your own exhaust or buy Barry's pipe off e-bay.
Then there is the chain tensioner issues. You will probably have to use a revised tensioner mounted on the top of your chain in the back. You will also have to modify your left rear brake pad to clear the chain unless you go to a disk brake.
They are not the most fun build, but I am fortunate to have a mini Machine Shop to build parts.
If you get stumped on somethiong feel free to shoot me a privat message. I will give you my phone number and help you with some parts.
I have another OCC bike ready for another motor, I am trying to hold off till winter.
John
Pretty much any Auto parts store, they are actually valve cover breathers. Come in three colors, red, white and blue usually abot $9.95.Hey RETMACH where do you get that airfilter, I love the look of a lil cold air intake like filter and I want one. Size, part # anything would be helpfull.
John
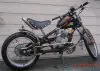
Russell could you post some more pics of your occ I would like to see the motor mount and if you used a chain tensioner ? Is that a speedo on the bars ? thaks John
Lefty,
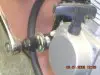
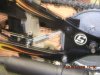
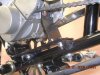
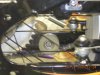
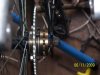
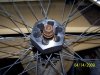
Here are some pictures!
1. Shaft extension
2. Front portion of mtr mount
3. Spring tensioner
4. rear portion of mtr mount
5. Tensioner
I don't have the heart to put a basket on this. Guess I'll still have to use my DIY electric for trips to the store...
Russ

Here are some pictures!
1. Shaft extension
2. Front portion of mtr mount
3. Spring tensioner
4. rear portion of mtr mount
5. Tensioner
I don't have the heart to put a basket on this. Guess I'll still have to use my DIY electric for trips to the store...
Russ
Attachments
-
 71.6 KB Views: 154
 -
 74.1 KB Views: 171
 -
 83.4 KB Views: 167
 -
 84.5 KB Views: 163
 -
 78.2 KB Views: 158
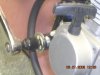
Hi Russ, I Like The Motor Mount, Looks Solid. The Hidden Spring Loaded Tensioner Keeps The Build Looking Extra Clean. Thanks For Sharing. I Have 2 Blk Schwinn Oc Choppers And 1 Green, They Are In Nice Shape. They Have Screw On Freewheel Sprockets For The Pedal Chain. I Had A Die Made To Cut Left Hand Threads On Left Side Of Rear Wheels. I Have Not Miked The Chopper Hubs Yet (on The Left Side) But They Look Close. With Your Pull Start You Could Run A Freewheel Rear Sprocket. It Is A Nice Option. Ron . . . .
Attachments
-
 81 KB Views: 154
Russ, Yes They Are Both On The Right Side. That Is My Cvt Rite Side Drive. Did Not Mean To Confuse Anyone. I Have 2 Pull Starts Like Yours. Have Not Installed Them Yet. After Using The Rear Wheel Freewheel, Would Prefer To Have It On All My Builds. I Also Like Your Left Hand Pedal Extension. How Did You Accomplish That? Is It Removable For Maintenance? Anyway A Person Can Save A Few Bucks Is Great. Just For Kicks I Will Post A Pic Of The Left Hand Thread Die. Later, Ron . . .
Attachments
-
 108.7 KB Views: 143
Last edited:
"My CVT side" CVT? Yes a freewheel on the wheel sprocket would be great. How much did it cost for the die(1-3/8 x 24)? On all my electrics I had to modify hubs to put a freewheel on the front sprockets. Be careful on the pull starts, the plastic pawl inside is weak. Also put a pin through the knot in the start handle.
As for the shaft extension. 1. Cut off the end of a steel crank arm. then grind it round.
2. Cut off 1-1/2 in. of a spare cranck shaft. 3. weld them together and drill down the center. reinstall with a longer m8 bolt.
As for the shaft extension. 1. Cut off the end of a steel crank arm. then grind it round.
2. Cut off 1-1/2 in. of a spare cranck shaft. 3. weld them together and drill down the center. reinstall with a longer m8 bolt.
Attachments
-
 71.6 KB Views: 138