I have been a mechanic for about 25 years, In fact I started in my Fathers shop when I was probably 12 years old.
I have played with all sorts of motors, But none quite as poorly assembled as a China Girl.
But I have a soft spot for them, mostly because of the price.
This is my 5th Motor, and with in about 20 minutes of my wife returning from town with it today I had it stripped.
The point of this thread is to show others that if you intend buying one of these motors, I advise you do the same.
The Good.
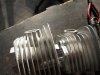
This motor came with a center fire head, which although has lower compression gives a better burn, has more cooling capacity and will generally give better torque than the angle fire.
It has a 40mm stroke, again giving better torque and a slight increase in capacity.
The kit came with a better plug cap, not the one that falls apart!
And this motor did not come with the expected metal shavings and Chinese soil that 2 of my other motors had inside.
Everything came greased and oiled, which again was lucky.
It also came with the clutch removal tool, which not all kits do.
The exhaust is of reasonable quality compared to one of the others I received.
It has needle rollers in the big end, and all of the bearings look to be reasonable.
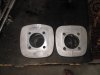
The Exhaust port flange is of the larger shape allowing a better match to a larger pipe.
And the motor has 8mm head studs opposed to 6mm which one of my motors came with.
The Tank is not dented!
The rag joint bolts are 8.8.
The Bad.
This motor came with a GT5 style piston and rod, this is mostly a hassle as the piston is hard to get in OZ.
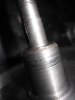
Although not as bad as some the crank seals where not straight.
The crank has not been polished where the seals run and will surely wear those seals in a short period.
Although the barrel was cast to take a 40mm inlet it does not have a 40mm stud spacing?
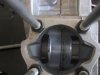
The piston was installed backwards, I'm sure the arrow is meant to point to the exhaust port.
The head nuts were not much more than hand tight, either were some of the studs.
Spring washers under the head nuts, never seen that on any other motor.
The clutch had been over greased, contaminating the parts that are meant to be dry.
It has the usual damaged Phillips head screws, only one of which was tight enough to warrant damage?
The crank is of the narrow (non counterweight) variety, leaving way to much void in the cases, and lousy primary compression.
One of the main bearings came out with the crank instead of staying in the cases, giving the impression it must be a loose fit.
The rings are of the cheaper variety, the better ones are lightly grooved to wear in faster.
Most of the woodruff keys seem a little loose, much better if they are a snug fit to the crank at least.
But the worst is going in the Ugly column.
The Ugly.
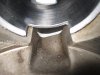
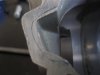
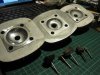
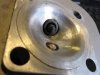
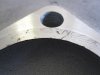
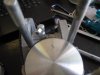
The head's mating surface is damaged, this does not worry me as I planed to modify the head, still it probably would have caused a leak.
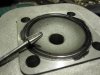
But the barrel, will be sent back!
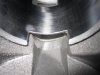
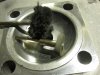
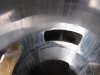
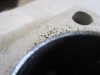
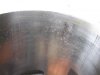
It has pitting in the bore, and porosity bubbles on the mating surface, so if the head didn't cause a leak this would have surely.
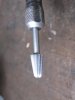
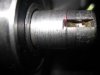
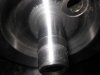
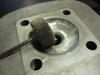
The crank has several 'marks' as though its been 'adjusted' with a cold chisel?
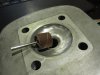
And the sharp edge on the step down to the clutch taper would surely damage the seal on assembly.
And the mag was not centered.
Previous motors were worse than this one and all had 'issues'.
I'm sure there are better ones, but if you buy an Ebay motor kit, think seriously about pulling it apart before you run it.
I can only fit 5 photos to this page, but there are more ugly things I could have put photos up of.


I have played with all sorts of motors, But none quite as poorly assembled as a China Girl.
But I have a soft spot for them, mostly because of the price.
This is my 5th Motor, and with in about 20 minutes of my wife returning from town with it today I had it stripped.
The point of this thread is to show others that if you intend buying one of these motors, I advise you do the same.
The Good.
This motor came with a center fire head, which although has lower compression gives a better burn, has more cooling capacity and will generally give better torque than the angle fire.
It has a 40mm stroke, again giving better torque and a slight increase in capacity.
The kit came with a better plug cap, not the one that falls apart!
And this motor did not come with the expected metal shavings and Chinese soil that 2 of my other motors had inside.
Everything came greased and oiled, which again was lucky.
It also came with the clutch removal tool, which not all kits do.
The exhaust is of reasonable quality compared to one of the others I received.
It has needle rollers in the big end, and all of the bearings look to be reasonable.
The Exhaust port flange is of the larger shape allowing a better match to a larger pipe.
And the motor has 8mm head studs opposed to 6mm which one of my motors came with.
The Tank is not dented!
The rag joint bolts are 8.8.
The Bad.
This motor came with a GT5 style piston and rod, this is mostly a hassle as the piston is hard to get in OZ.
Although not as bad as some the crank seals where not straight.
The crank has not been polished where the seals run and will surely wear those seals in a short period.
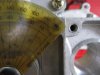
Although the barrel was cast to take a 40mm inlet it does not have a 40mm stud spacing?
The piston was installed backwards, I'm sure the arrow is meant to point to the exhaust port.
The head nuts were not much more than hand tight, either were some of the studs.
Spring washers under the head nuts, never seen that on any other motor.
The clutch had been over greased, contaminating the parts that are meant to be dry.
It has the usual damaged Phillips head screws, only one of which was tight enough to warrant damage?
The crank is of the narrow (non counterweight) variety, leaving way to much void in the cases, and lousy primary compression.
One of the main bearings came out with the crank instead of staying in the cases, giving the impression it must be a loose fit.
The rings are of the cheaper variety, the better ones are lightly grooved to wear in faster.
Most of the woodruff keys seem a little loose, much better if they are a snug fit to the crank at least.
But the worst is going in the Ugly column.
The Ugly.
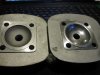
The head's mating surface is damaged, this does not worry me as I planed to modify the head, still it probably would have caused a leak.
But the barrel, will be sent back!
It has pitting in the bore, and porosity bubbles on the mating surface, so if the head didn't cause a leak this would have surely.
The crank has several 'marks' as though its been 'adjusted' with a cold chisel?
And the sharp edge on the step down to the clutch taper would surely damage the seal on assembly.
And the mag was not centered.
Previous motors were worse than this one and all had 'issues'.
I'm sure there are better ones, but if you buy an Ebay motor kit, think seriously about pulling it apart before you run it.
I can only fit 5 photos to this page, but there are more ugly things I could have put photos up of.
Attachments
-
 58.1 KB Views: 143
 -
 81.7 KB Views: 134
 -
 59.5 KB Views: 144
 -
 63.9 KB Views: 137
 -
 71.4 KB Views: 131