

Centrifugal clutch blues
- Thread starter silverbear
- Start date

In case you are still around to see this- an impact gun is dandy for items like this. I use one to take off the nut that holds the pulley on alternators- same principle.
Real good tip from Elmo too.
Real good tip from Elmo too.
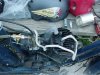
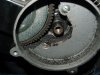
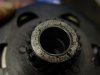
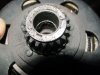
Pretty slick deal with that rope trick. That was simple enough. Nut turns to the left for removal. It took some patient wiggling to get the automatic clutch mechanism off, but it came. As you can see in the photos there is a fair amount of shavings/metal particles in there, so it is definitely the same problem Sir Rockenstein experienced with his. Tomorrow I will tackle the 'key' business. Any suggestions with this? I'm figuring to use a high speed drill bit in the same spot pictured in Rockenstein's. I'm not sure I understand after that point. So I tap that little hole (how deep?) and thread a screw in there. Then do I use a dremel to grind it flush? Does the shaft this fits on (what the bolt fit in to) also get metal removed so that there is a little groove for the edge of the screw to fit against? Or is the key just having to do with what is pictured in your photo, Rockenstein? Thanks again to all.
SB
SB
Attachments
-
 254.7 KB Views: 408
 -
 223.8 KB Views: 412
 -
 195.4 KB Views: 376
 -
 226 KB Views: 398
Yea that one looks like it spun and machined the crankshaft too...cheezee setup or what eh...it would have taken all of maybe 5 mins to broach a keyway in the adapters at the factory before hardening 
Oh well...
Silverbear I'm afraid a HSS drill bit won't even put a mark in that part, you'll need to use carbide, diamond or similar. I found that my Dremel with some small round diamond coated cutters were the best tools for the job, an 1/8th square or 1/8th round needle file (diamond coated type) would do it but it would take a while. Basically what you want to end up with is a 1/8 x 1/8 pocket on the flanged end of the crankshaft adapter that will mate with a modified woodruff key. Do you have a spare key from the small gear of a standard engine? A very rough example drawing of how you want the key to look when you put in place after modifying it is shown in the attachment.
I wish I had taken some better pictures of mine when I fixed it
.
Last edited:
Hmmm, so now I need to find a carbide or diamond tipped drill bit or two or three and a small (1/8" woodruff key). I guess I still don't understand about the cranskshaft and if it gets grooved a bit. Sounds like the only alteration is where you have indicated on the crankshaft adapter. Someone else has suggested making a woodruff key from a section of flat washer, but since I'm going to the hardware anyway I may as well make my donation to the local economy and get the official, 'real' thing, probably made in China from a flat washer. I'll take pictures, if nothing else to show others what not to do. Thanks for the help. I would not have had a clue about this and the engine would have spent a long time sitting on a shelf unused. Basically it is a good motor, but I'm thinking on the other one to check that bolt and perhaps a dab of locktight is in order as a preventative. That might be a kind of standard procedure on a new automatic for anyone, do you think? Sounds to me like AaronF had the same happen to his. You're right, it is a cheezy way to make things at the factory. I wonder how many of these have failed.
SB
SB
Been shopping and have a couple drill bits and two woodruff keys. Why two? So I'll have one as a spare when I forget where I put the first one. However, I'm still not ready to go since I realize that I am still unsure of what I'm doing. I get the idea from the photo of Rockenstein's fix that the key only involves the adapter, but my limited experience with things using a woodruff key is that there is a slot in two surfaces begin joined or kept in place with a kind of wedge... so it is locked into place with the woodruff key. Or maybe I'm mixed up on that, too. Anyway, when drilling out that keyway is the adapter in place against the crankshaft? And if so is the keyway made parallel to the crankshaft so that a groove is being created not only in the adapter, but also in the crankshaft? That's how it would seem to work to my thinking. Or is the opening or keyway somehow at a diagonal which is how it looks in the picture? I think I know how this should be, but I'd like the comfort of knowing exactly what it is I'm trying to do. Many thanks.
SB
SB
Yes the only thing you'll need to mess with is the adapter and the key...no need to do anything to the crankshaft, it will have a key slot I'm sure. If by chance it don't you will be in a bit of a situation tho since the press fit tolerances have likely been machined away. I just measured a spare key I have and for reference it's 2.5mm thick x 9mm in length.
Yea good idea but to add to that thought maybe grind 2-3mm off the end of the bolt just to be double sure it's isn't bottoming out in the hole and giving you a false impression that it's perfectly tight.but I'm thinking on the other one to check that bolt and perhaps a dab of locktight is in order as a preventative.
I feel better knowing I'm not the only one that does thatBeen shopping and have a couple drill bits and two woodruff keys. Why two? So I'll have one as a spare when I forget where I put the first one.
Check and see if there is a key slot cut into the end of that crankshaft, if there is start with the key...
File or grind the key until it sits in its spot in the crankshaft and looks something like the example I posted. After you get things looking like that then proceed to get a notch cut into the adapter. Do many test fits so as to get it nice.
I'll keep a close eye on this thread to help you out...
Ah man, what a dope! I hadn't noticed in the dark last evening and didn't look this morning to see if there was a key slot in the crank shaft, assuming there wasn't. There's the danger in making assumptions, and all this stewing over something i did not understand. Now it makes sense. I'll give it a try this afternoon. Thank you, Sir Rockenstein.Yes the only thing you'll need to mess with is the adapter and the key...no need to do anything to the crankshaft, it will have a key slot I'm sure. If by chance it don't you will be in a bit of a situation tho since the press fit tolerances have likely been machined away. I just measured a spare key I have and for reference it's 2.5mm thick x 9mm in length.
Yea good idea but to add to that thought maybe grind 2-3mm off the end of the bolt just to be double sure it's isn't bottoming out in the hole and giving you a false impression that it's perfectly tight.
SB
Actually I also needed a sandwich, a can of liquid bread (beer) followed by a nap. Thus fortified I am now ready for battle! Where is my trusty dremel? My wedgy little woodruff? My grimy adapter? Sound the trumpets! Forward, MARCH...Looks like you are on the right track Silverbear. Now all you need is time and patience.
SB
We have fought bravely, but it is time for retreat from the field of battle. We must confer with General Confusion, General Disaster and General Motors. Maybe General Foods for a fortifying snack.
The woodruff key at 1/8" by 1/2" was too big, so we surgically ground away at it until setting it down somewhere just for a moment, but long enough for it to hide. I looked at Rock's email again suggesting 2.5mm by 9 mm as the correct size woodruff key. Why not contribute a little more to the local hardware and help stimulate our county's economy? So another 12 mile patriotic foray into town. Ace is the place with the helpful hardware man who surely speaks in metric. Not. He got out a little book and stared at it for some time, finally announcing what a millimeter is in centimeters. I said that is no help since the woodruff keys only speak standard American inches, like 1/8 which is too big. So, I got woodruff keys #1 and #2. At 1/16" thick #1 is too thin, but #2 is the goldilocks of woodruffs at 3/32 and is just right. Awesome and no more grinding! Now all we have to do is make that little groove in the adapter and we are home free with plenty of time yet for a bike ride.
I picked up a 3/32" drill bit on the last trip so chucked it up in the dremel tool. It is too small for the dremel to lock down on it and I don't have a different chuck. So, we can still do this, but it will be a little more cumbersome with the portable drill. That adapter sure is hard metal alright and even the punch doesn't like it. How come the rest of the motor is made out of cheese, but the part I want to drill a hole in is titanium?
This is not working as I can't even start a hole so that I can break the bit and go get another one.or two. I guess tomorrow I'll go back to the hardware and get a little file, Or I'll see if there's something in the world of dremel I can get. Maybe a drill bit is not the best thing. Rock mentioned a carbide cutter. What's that? A cutter sounds promising. Why drill when you can cut? I will not give up and haven't had this much fun since my last trip to the dentist. That's what I need; one of those dentist drills with a diamond cutter thing. Sigh...
SB
Yeah, that's true enough. It would be even more fun thinking about it while riding the bike though. Not the end of the world. I will not give up. Who made a gas tank out of a can? SilverBear, that's who! (Well, Rockenstein did it first.) And who made a headlight out of another can? Me, that's who! (Come to think of it, Rockenstein did that first, too.) Well I made a can funnel and a can tail light and a can fender light and I can do this, too. Yes we can! President said so!!!Just think of the knowledge you have acquired.
I'm open to suggestions on how to make that little groove in the adapter. I really would like to ride me motorbicycle... The motor still runs great. Starts easy and revs up nice. It just won't move the bike,so it's like riding a noisy 1939 exercise bike without peddling. Mildly fun, but the thrill is gone.
SB
Yep they hardened them adapters up good didn't they..lol..go figure
I just tried a carbide burr on a piece of hardened steel and I didn't much like the result. If you can get diamond coated cutters for your Dremel I really do suggest them for this job Silverbear. The ones in particular that would be close in size and shape to what I used are the Dremel number 7122 & 7103 points. Yes they are small but it's better to work the notch up a little at a time to the required size and shape with many many test fits! Once you grind metal away you can't put it back
Here's a link to the Dremel catalog page.
Click Me
.
Last edited:
Thank you,Yep they hardened them adapters up good didn't they..lol..go figure
I just tried a carbide burr on a piece of hardened steel and I didn't much like the result. If you can get diamond coated cutters for your Dremel I really do suggest them for this job Silverbear. The ones in particular that would be close in size and shape to what I used are the Dremel number 7122 & 7103 points. Yes they are small but it's better to work the notch up a little at a time to the required size and shape with many many test fits! Once you grind metal away you can't put it back
Here's a link to the Dremel catalog page.
Click Me
.
I've ordered a kit of diamond bits which should be here in a few days. I can wait. If I can find a 122 size which is 3/32 locally I'll get it, but don't want to do too much running around and the local hardware stores are small. I already know they don't have much.
I will definitely check out the bolt in the other engine and will shorten it up a bit, then use some locktight to avoid this happening. What a waste of time when the company could have done it right in the first place for not much expense. Half of the keyway is already there. What would it have taken to do the slot in the adapter? Ah well, now I know what to do to fix it, thanks to you, my friend. I'll check back in when the deed is done.
SB
I had trouble with my boy go fast engine with pulling the bike. With my motor
it was the clutch cover that fit over the pucks was smooth on the inside. I replaced it
and it pulls like a champ.
it was the clutch cover that fit over the pucks was smooth on the inside. I replaced it
and it pulls like a champ.
And now here is a way to amaze your Ace hardware drone.
Remember this number 25.4
To convert metric to standard divide the metric value by 25.4, 13m/25.4=.511"
To convert standard to metric multiply standard value by 25.4, .5"*25.4=12.7m
And just an interesting side note, titanium is actually not to bad to machine, it's like 300 series stainless believe it or not. Good luck Silver, the good news is that the adapter is probably only case hardened, the bad news is you will likely just be getting below the heat treated outer layer as you finish up.
The part that you are grinding on is shaped like a bell with weights inside.When the weights spin around they move out against the outer shell and press against it hard enough to keep it from slipping. Centrifugal force and friction is what makes it work.Question,,,,I understand the key and slot thing,,,does the centrivical clutch pull tight against a machined shoulder on the crank ,or the bearing which is against a machined soulder or is it a beveled shaft