First build by most not handy guy

GoldenMotor.com

Blake84

New Member
Jul 15, 2011
136
1
0
39
miracle mile los angeles
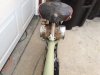
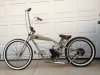
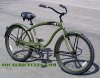
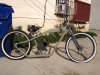
let me start by saying i was so proud of myself for removing the front and rear wheel. This should give you an idea of how handy of an individual i am. I purchased the below low rider felt from norm at venicemotorbikes.com. After enjoying it i decided i would like to build the next bike myself so that i could learn about the bike since i know nothing. Also, after the first group ride i attended i realized most people build the bikes and take so much pride in their creations.

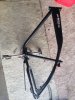
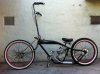
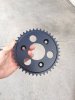
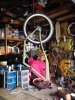
I had a stock felt el guapo in my garage and decided this would be the bike to motorize. I spent last night stripping the bike down to the frame. I ordered a 2 stroke engine kit and it should be here in the next few days. I thought i could document my build on the site and get some input.

I uploaded a picture of the frame i have and also a pic of the bike i have.

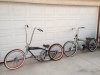
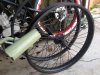
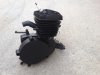
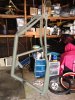
The next 2 pics are a theme i kind of like. Military rat rod kind of theme.

Option #1 i was thinking about attempting to make pretty much the same frame shape as the bike i currently have (norms design) only not doing the inframe tank (because i have no idea how) and going with a handlebar mounted keg style tank inside a leather bag.

Option #2 just keep stock frame with motor and behind the seat keg style tank (i am not a big fan of the standard tank.)

i am sure i will have a ton of questions.
 

Attachments

Blake84

New Member
Jul 15, 2011
136
1
0
39
miracle mile los angeles
Re: First build by most not handy guy military lowrider theme

So I decided to go with option 1 and i dove in head first

Today my engine kit arrived and i opened it and realized the only thing I know how to do is mount the gas tank. I have Lot of YouTube instructional videos to watch.

I bought a dremel and chopped the bikes frame into pieces and now I need to ad a pipe and start welding. I'm having someone help me with welding but teach me at same time so I'll see how this goes.

I sprayed down the frame with Klean strip aerosol can and holy crap that stuff is insane! The paint literally came right off with a rag and I had a perfect naked frame.

I picked up my hub adapter today and a 40 tooth sprocket and installed that to the back wheel (it's the bike wheel right ....just kidding).

I deflated the tire and can't figure out how to remove the thick brick tire from the rim. I'm afraid to bend the lip of the rim trying. Any tricks?

I picked up the paint today and primer and will post pics when the frame is welded into one piece
 
Last edited:

scud

New Member
Dec 3, 2011
38
0
0
Fountain Valley
make sure the tire is completely deflated to allow for the most "play" in the tire. with some of the thicker tires a little lubrication helps to remove it. something as simple as windex or similar can help a great deal. do not use any screw drivers or pry bars to get the tire off. do it by hand and be patient.
 

2door

Moderator
Staff member
Sep 15, 2008
16,302
175
63
Littleton, Colorado
Bike shops sell plastic tire tools with smooth edges. Like the man said; Don't use a screwdriver or anything sharp. You'll puncture the tube and scratch up the rim. If you can do it by hand, that's the best/safest way. To be sure the tube is completely deflated, remove the valve stem core.
Tom
 

KCvale

Well-Known Member
Feb 28, 2010
3,966
57
48
Phoenix,AZ
So I decided to go with option 1 and i dove in head first
I was hoping you would go with the 'OldArmy' theme like the Felt rebuild/repair I have in the shop right now. It's a 4-stroker.
...I opened (the motor kit) and realized the only thing I know how to do is mount the gas tank.
There are many other tank options ;-}
I deflated the tire and can't figure out how to remove the thick brick tire from the rim. I'm afraid to bend the lip of the rim trying. Any tricks?
No tricks other than a couple of dull screwdrivers and a little dish detergent.

One thing I can mention is before you get too far look at how you are going to get the fat rear wheels sprocket to be outside the tire and still run in a perfectly straight line to the motor sprocket with both sprockets teeth being in perfect alignment too.

If you think you can just mount the wheel and motor cock-eyed or somehow bend the chain back and forth laterally with a tensioner you are sorely mistaken, it will fail.
I know 1st hand, this is the army Felt I have in the shop right now because the original hack that built it and the other 2 guys the customer paid to 'fix it' the last couple of years tried that very thing and it didn't, and this is 4 stroke mount that will move laterally!


It was a mess to move the rear sprocket farther out with that band brake on it and then re-align the motor to match it, and the chain doesn't clear that fat tire by much, and the motor is way left to just get it aligned, BUT...
The sprockets are aligned in perfect both Vertical point to point contact and Lateral Horizontal angle as well.

Chains only bend in one direction not two, and that goes for even being 'bent' from a cock-eyed sprocket doing the bending.
Every link will repeatedly bent back and forth cock-eyed every time it enters and leaves the sprocket.

Just a tip for a newbie bud and good luck with the build, and I sure hope you aren't going to do this with a fixed mount 2-stroke motor without making new mounts as it's not just the back wheel sprocket needs to be outside the tires outside, the motor sprocket needs to be too, and they have to be dual alignment.
 

2door

Moderator
Staff member
Sep 15, 2008
16,302
175
63
Littleton, Colorado
KC speaks the truth. The engine may well need to be offset from center to get chain/frame/tire clearance and even then you might need to do some creative engineering. I'm not familiar with this particular bike and rear brake situation but it might be possible to space the rear, driven sprocket outboard but even so, with a fat rear tire and limited space for the sprocket, the engine is most likely going to need to be moved to the left of center. My Nirve Switchblade required 9/16" offset from center to get things to line up which required fabricating new mounts, front and rear.
Tom
 

Blake84

New Member
Jul 15, 2011
136
1
0
39
miracle mile los angeles
2 door and kcvale. Thanks for the advice. Fortunately I spoke with norm from Venice motorbikes and I ordered the sportsman hub adapter which offsets the sprocket outside the wheel so the chain will clear the tire. Also I am offsetting the engine slightly.

Thanks for the pic of the military felt. I love it. I hope to try riding a 4 stroke someday. I like that fact that it's straight gas no mixture and I'm not a big fan of pedaling every time I come to a complete stop. I was jealous on the last ride I did when the four stroke guys just took off on green light and I was pedaling :)

I got the tire off!!!! Thanks for advice

Today I sanded and self etching primered the front and rear rim and the hub adapter kit.i then Sprayed the rims and spokes flat black as well as the hub kit. I also picked up flat black engine paint to paint my engine. Question about painting engine. Is there anywhere on the engine that CAN NOT get paint on/in/or near. Should I tape around spark plug or remove spark plug? I'm afraid to get paint inside engine so I thought taping around spark plug would be better.

Where is a good place to order a keg style gas tank that I can fit in a leather punch on handle bars? The ones I found seem super pricey

I will begin the welding process tomorrow and will update pictures of the new modified frame prior to painting.

I am extremely intimidated by installing the engine kit. Is there a link to a detailed instructional video or PDF or anything?
 
Last edited:

Blake84

New Member
Jul 15, 2011
136
1
0
39
miracle mile los angeles
i need opinions......i took a picture in my first post of a lowrider car that i got the idea for the theme im going for. In the first pic below i sprayed a piece of tube the color i picked out for the bike and held it up next to the black wheels. So i need to know is it a good green? Should i go darker? Its the closest i could find to the car in the first post. The green in the pic is a flat camo green. Im just looking for some input if you think its a good color combo. I also took a picture of the engine i painted black and the sprocket i painted as well. Im working on the frame welding now

thanks in sdvance for any input
 

Attachments

Blake84

New Member
Jul 15, 2011
136
1
0
39
miracle mile los angeles
so i finished the frame. And sanded it down. I primered the frame and then painted it. I started to put the bike back together and the springer fork i ordered is not coming until monday so for sh*ts and giggles i put on the stock fork from the felt el guapo and i think i like it better!!!!! This bike is for other people to ride with me and also for me to ride so i think this will be less squirmmy than the sringer.

So what do you think of my first build SO Far???? I'm not anywhere near done. I want to paint fork and handlebars flat black as well as crank where pedals go flat black. No chrome!

I did run into some problems so far. Pedal hits the engine head slightly because i had to offset engine. I need to by wide pedals if they make those. I dont have much room to move the engine around.

Problem 2 i opened the engine kits parts today and realized the cap that covers spark plug was shattered so i dont know what do to about that.

Problem 3 forgot about the pice i needed that holds the back tire in place and bolts to frame.

And that is so far the issues i have im sure there will be more to come.

I gotta say i am having a blast doing this.


Attachments

Last edited:

Blake84

New Member
Jul 15, 2011
136
1
0
39
miracle mile los angeles
SO i got the bike back together and functioning as just a bicycle now. It rides well I am just used to the extended springer fork on my other bike so this one feels weird. I am dropping bike off today with culvercityclassics to have a "pork and beans" gas tank installed behind my seat. After I get the bike back I will be able to fire it up and test out the ride. I will post a pic with the gas tank on and a video. Im still torn between painting all the chrome flat black, i think the look will be great but im nervous to paint over chrome.
 

Blake84

New Member
Jul 15, 2011
136
1
0
39
miracle mile los angeles
what about sanding the heck out of it until the chrome is gone and then painting???
thats pretty much my only option i dont have too many tools so I am dreading sanding by hand. I might call to see how much it would cost to just have it done professionally. That was if it doesnt work out its someone elses fault :)
 

scud

New Member
Dec 3, 2011
38
0
0
Fountain Valley
thats pretty much my only option i dont have too many tools so I am dreading sanding by hand. I might call to see how much it would cost to just have it done professionally. That was if it doesnt work out its someone elses fault :)
yeah, I've always had success sanding/painting chrome...so long as I was patient and used a good rattle can (with a prime, paint, clear process).

In the past I've used a flapper sanding wheel on a dremel to get things going fast...then would finish off with finer and finer grits of paper by hand. Then I would let parts sit after paint and cure for a couple days before putting them into action!
 

Blake84

New Member
Jul 15, 2011
136
1
0
39
miracle mile los angeles
Bike is done and fired it up! I'm having one problem and I don't know how to fix it any help would be great. I can't pull the clutch in and bring the bike to a stop and have the engine stay running. It stalls. It also does not accelerate as quick as my other bike. What could be causing the engine to stall out and not stay running when the clutch lever is pulled
 

Blake84

New Member
Jul 15, 2011
136
1
0
39
miracle mile los angeles
Thanks for the positive feedback. Today i added a chain tensioner and bolted the muffler to the frame to stop vibration. I still have some painting to do but here are some pictures.

Big thanks to Norm at Venicemotorbikes for his help in getting bike going and letting me copy the frame he came up with :)

And big Thanks to culvercityclassics for his pork and beans style gas tank and lay back seat post and also for giving the bike a once over a fixing all my mistakes on my first build

I learned alot and here is a short video of the 2 bikes together!

http://www.youtube.com/watch?v=Ioeyb9BTfiI&context=C3add22aADOEgsToPDskIoKEaY4U6ViW5T-srZc0kY
 

Attachments