my bonus was better than expected so i bought a spoiler

GoldenMotor.com

mike

New Member
Oct 20, 2008
18
0
0
corpus christi texas
i just bought a schwinn stingray spoiler online. still cant believe i paid over 500 for a bicycle but ive drooled over that bike for a while. I bought a mount from barry on ebay from suggestions from other posts "love the forum".Both are being shipped as we speak but of course my mind is racing about this build. i have a couple questions for anyone who has built one. i am planing on an 80cc king have had good enough luck with kings kits in the past. My main concern is the rear sprocket. Was hoping somehow to save the rear disk brake or maybe mounting old school rear brakes off the smaller occ bikes and mounting sprocket to the disc mounts any enlihgtenment on this would be greatly appreciated..santa
 

hill climber

New Member
Sep 11, 2008
113
0
0
paso robles, california
you might be able to use the top hat sprocket adapter. why not get a shifter kit and run it through the three speed hub? no derailer plus the fact of being able to free wheel while coasting, soooooo nice.
 

jasonh

New Member
Jun 23, 2008
1,590
0
0
40
Longmont, CO
I haven't seen one yet.

The top hat adapter would probably be the best bet. better mounting, plus you get to keep your brake.
 
Sep 20, 2008
1,668
12
0
Clearwater, FL
web.tampabay.rr.com
Mike,

Good afternoon.

You are sitting in a very fortunate position on this build.

I bought two new spoilers a few weeks ago to build for myself and my girl.

I will be starting the design/build this weekend.

These really are cool bikes!!! They actually ride a lot better than I would have expected.

Forget the top hat adapter for the sprocket...it won't work If you plan on keeping the rear disc brake.

I will be posting photos as I go along with this build...If you see anything you like...let me know and I will give you the cost. You will have a narrow window of time to make a decision on some of the parts since once the CNC is changed from one part to the next the previous will never be done again.

Follow along with my thread, (I will start it next week), and you will have the opportunity to have one of 3 of the coolest spoilers ever built.

Jim
 
Last edited:

jasonh

New Member
Jun 23, 2008
1,590
0
0
40
Longmont, CO
Hey Jim, just curious - why would a part never be done again once the CNC is changed? Just the hassle of changing the bits and putting the program back on or what?

edit - man, those bikes look dang sweet too. Now I'm kinda wishing I had one, lol.
 
Last edited:

mike

New Member
Oct 20, 2008
18
0
0
corpus christi texas
well she is on the road a little more rattle then i would like but i hope when i lean the mix after the break in it will settle down a bit. i went ahead and used the top hat adapter i got the rear disc brake to work after some crafty engineering. i made a bracket the moved the calipers out just enough to clear the sprocket. i mouted the adapter reversed where the sprocket is on the inside and the disc is on the outside. i used a 32 tooth sprocket and it gave me just enough room that the calipers grab maybe 1/2 to 3/4 of the disc. at first it wouldnt work becuase the calipers would pinch at an angle from the open space side of it and not really grab the disc enough to stop the wheel so i put a spacer (wire rap) and now it grabs flush. now it doesnt stop you in your tracks like the front brake does but it does work better then the old school hand brakes on my other builds. im waiting for a sunnier day to take some photos and ill post em. i have ran it around the block a couple of times comin back and tweaking here and there but today im gonna try and get a real ride in on her. thanks again for all the info guys i really apreciate it. ill post some pics soon.
.rd.
 
Sep 20, 2008
1,668
12
0
Clearwater, FL
web.tampabay.rr.com
Hey Jim, just curious - why would a part never be done again once the CNC is changed? Just the hassle of changing the bits and putting the program back on or what?

edit - man, those bikes look dang sweet too. Now I'm kinda wishing I had one, lol.
Exactly:

I shouldn't have said "never", it's just that I doubt anyone would be willing to pay the price.

It would bump a $30.00 part to $230.00.

These bikes are a bit rare, and I don't see a market for parts that would justify fixturing, and a volume production run.

I'm going to do 2 of them anyway, so if Mike wants parts for his it will be straight time and materials. If there is anyone else with one of these bikes that wants in on it, just say so.

Jim
 
Last edited:

mike

New Member
Oct 20, 2008
18
0
0
corpus christi texas
awesome jim i really apreciate it. the exhaust i had my buddy weld up looks kinda ugly but it works. the beauty of these things is how different the same bike and same kits can actually be. but building is half the fun. im sure most of us are the same way as soon as i get a build complete and dialed in i started chompin at the bit droolin over my next project. best of luck they are super cool bikesdance1
 
Sep 20, 2008
1,668
12
0
Clearwater, FL
web.tampabay.rr.com
Wow. There must be more to it than I thought.
Yes there is...It's not the programming or the time required to re-load the program:

I'll attempt to explain the procedure.

After the part is designed, (this can take days depending upon complexity)...I import it into my programming software and generate the tool path for the CNC. This can take anywhere from 15mins to all day for a set of billet Aluminum automotive heads.

If an odd shaped part is fully machined on all sufaces; a set of soft jaws for the vise, (Aluminum), have to be cut in based on the exact location of the vise in the machine and the part geometry.

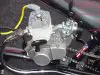
Look at your clutch actuator housing...it is an odd shape, and a good example of what is required to make a complex part.

First operation:

The part was nothing more than a block of Aluminum clamped in the vise. The material was 1/4" thicker than when finished. The outside was profiled, the face was flycut, the pocket for the sprocket was created, then the part was drilled for the mounting screws and the relief hole for the pin, at the end of the progam a chamfer tool is called up in the program to deburr the part.

Second operation:

Change the vise jaws for a set that have been pre-machined to the shape of the part. Touch off all tools to the surface of the part so that the machine has a reference point based on depth for each tool.

Mill the face to within .015" of finished dimension. Flycut the face to finished dimension, counter bore the holes for the allen bolts, and chamfer all edges.
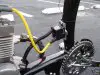
Third operation:

Fixture and clamp the part upright in a manual mill. Dial-in the 0,0 reference points.

Drill holes for the CAM

Fourth operation:

Change tools

Put the parts back on the same fixture and ream the holes to a precise tolerance.

Fifth operation:

Deburr & inspection

Repeat the above for the clutch arms...less tools, fewer Ops, but basically the same procedure as this part is also fully machined.

I won't even go into what was required to make the cams...describing the set-up of a Brown & Sharpe screw machine would take hours. laff

It typicaly takes 2 hours to dial indicate the vise and write a program to cut the jaws to an exact X0,Y0,Z0 position. This represents a one-time temporary fixture...once the vise is removed the process has to be repeated.

I spent a week making fixtures for the clutch actuators, so that I could quickly set everything back up and make more.

I don't plan on doing this for the Spoiler parts. The demand simply isn't going to be there.

Jim
 

junkyard

New Member
Jan 6, 2009
82
0
0
st.petersburg fla
i have a spoiler i did a few yrs ago with a pocket bike motor but im really interested in your build jim cuz i took off the pedal drive to keep my disc brake in the rear and now i dont ride it because of that

i put lights and blinkers on it but never tried to get it registered......might be easier to put the pedals back on....lol
 
Sep 20, 2008
1,668
12
0
Clearwater, FL
web.tampabay.rr.com
i have a spoiler i did a few yrs ago with a pocket bike motor but im really interested in your build jim cuz i took off the pedal drive to keep my disc brake in the rear and now i dont ride it because of that

i put lights and blinkers on it but never tried to get it registered......might be easier to put the pedals back on....lol
Follow what's comming...if you like what you see; jump quick, because I won't be doing this again any time soon...if ever. I really want a Felt Bolt!

Jim
 

junkyard

New Member
Jan 6, 2009
82
0
0
st.petersburg fla
Follow what's comming...if you like what you see; jump quick, because I won't be doing this again any time soon...if ever. I really want a Felt Bolt!

Jim
exactly....i cant wait to see what your gunna do

on my first try i went electric and made a makeshift transmission of sorts and mounted that and the elec motor under the seat behind the seatpost tube....totally removable with no holes in the frame....i guess it was a jackshaft out of an old steel hub with 3 sprockets.....one solid for the motor the second solid for the rear wheel and the 3rd was a freewheel to the pedals..the 2nd and 3rd sprockets were the same size.....worked perfect but wasnt enuff

if i could get a jackshaft with that setup i could flip the wheel back over and use the stock freewheel in the back and get my pedals back and keep my disc brakes

im not far from you so i might even swing by to check it out personally once you get some stuff together........im probly gunna have to decide while your stuff is still setup.....ive seen some of your work so i know whatever you end up doin is gunna be cool

im getting the bike for my next project on saturday.....im gunna use a china girl....i hope you have some clutch kits left.....still need to save up for the motorkit tho

waiting anxiously for pics

ps: i got these pics from broward county cycles before the site went down.....i didnt like the way he drilled thru the frame on his mount......this is not my bike
 

Attachments

Last edited:

mike

New Member
Oct 20, 2008
18
0
0
corpus christi texas
sweet had my first real ride on the spoiler last night. wow that 32 tooth sprocket makes her lightining quick. had a great ride with no troubles. the term hard tail comes to mind she vibrates pretty good but she is strong. i ordered a new seat hopefully some suspinsion in the seat will help. i am also considering filling the handlebars with sand and caulk to absorb some of the vibration. i know some old school bikers and they swear by this to cut down on the vibrations. should post some pics this weekend guys thanx again for the info guys .shft.
 

junkyard

New Member
Jan 6, 2009
82
0
0
st.petersburg fla
sweet had my first real ride on the spoiler last night. wow that 32 tooth sprocket makes her lightining quick. had a great ride with no troubles. the term hard tail comes to mind she vibrates pretty good but she is strong. i ordered a new seat hopefully some suspinsion in the seat will help. i am also considering filling the handlebars with sand and caulk to absorb some of the vibration. i know some old school bikers and they swear by this to cut down on the vibrations. should post some pics this weekend guys thanx again for the info guys .shft.

sweet.....i got mine to 36mph and the vibrations werent too bad but it wasnt a far ride

gratz on the build