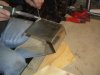
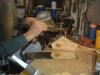
As with so many things in fabrication and in painting, preparation is what takes most of the time and makes all the difference in how well things turn out.
There are different kinds of solder. When I made stained glass windows I used a 60/40 solder which was 60% lead and 40% tin. Dan is using 50/50, half tin and half lead and for certain things he has used a solder composed entirely of tin which leaves a shiny surface. Lead tends to dull when left to oxidize. If clear coated while it is still newly soldered or freshened up with fine steel wool, it should retain its shine. For my V8 gas tanks I have used silver solder and either a propane or butane pencil torch for the soldering. Please note that a flux (which is an acid and allows the solder to flow into the metal being soldered) must be used. Flux appropriate for silver solder will not work with lead/tin solder and vice verse, so you must use the appropriate flux designed for the solder choice. Silver solder is quite expensive compared to lead/tin, so keep that in mind when making your choice. I can see that Dan's approach works well and from now on it is also what I intend to use, at least with tin.
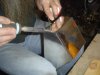
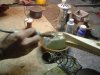
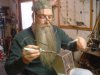
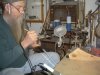
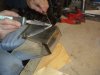
Dan's flux is a liquid (there are also paste fluxes) and he has poured a small amount into a plastic container cap to dip a small paint brush into. He applies the flux to the area to be soldered, in this case the inside of the flange and also a quarter inch or so along the top piece.
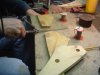
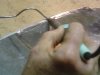
Dan is using a hundred watt soldering iron which can accept different sized tips. For copper work a higher wattage iron will likely be requirted which will be discussed at that time.
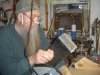
He has on hand a section of sponge soaked in water and also a block of sal ammoniac. He could explain it better than me, but the sponge is useful for two things. He can fine tune the temperature of the tip by cooling it with the sponge and he can also clean the tip, wiping it against the sponge. When it is dirty the tip does not want to accept the solder, which it needs to do to be "loaded" with solder in the same way that a paintbrush would be loaded with paint. If my understanding is correct, the sal ammonica is also an acid and acts like a flux for the soldering iron. Preparing and loading the iron with solder is called "tinning" the iron. I also used to use fine steel wool to clean the tip. The sal ammoniac makes nasty fumes which are toxic, so avoid breathing it in when cleaning the tip and dragging the hot tip over the block. Ventilation is always a good idea when soldering with lead based solder. It, too, is toxic, especially to our nervous systems. Not a big deal for one gas tank, but for eight hours of soldering it can become a health issue. Just a word to the wise.
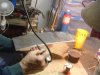
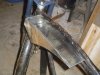
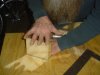
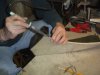
So, in short, Dan applies a flux to the area to be soldered, tins the iron and is starting at the point where the long piece of tin wraps around to the bottom. For this side Dan is running a continual bead as much as possible. It has been six years since he has been doing this work and while enjoying being "back in the saddle again" he says that he feels rusty and is not happy with the steadiness of the soldering line. But keep in mind that Dan is meticulous. If you or I did it we'd be patting ourselves on the back for a job well done.
(cont.)


 212.2 KB Views: 375
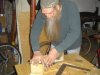 255.5 KB Views: 350
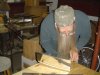 251.4 KB Views: 369
 208.1 KB Views: 391
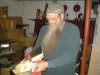 232.5 KB Views: 408
")
")