Silverbear's in frame peanut tank

GoldenMotor.com

silverbear

The Boy Who Never Grew Up
Jul 9, 2009
8,325
670
113
northeastern Minnesota
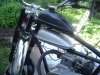
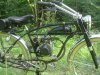
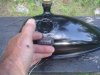
Right now I'm running a peanut gas tank on my 50 Panther. I had a nice in frame tank made by Sportscarpat and let it go to a friend for his build. At some point when I have the time I intend to make a nice copper in frame tank now that I know how, but until there's down time the peanut tank will have to do. Actually on this build the tank doesn't look bad. I don't mind it. One day I got to looking at the shape of the opening between the cross bars and realized it was much like the profile of the peanut tank. I wondered if it would fit in between the cross bars...

The filler cap was in the way and even if it did fit how would you fill it with the cross bar in the way of the filler? But if that stock filler was gone... and if a different filler was offset to the side... maybe then it would slide in there. I measured and it would fit. It would also fit in the same space on the Worksman. I wondered how it would look... so I decided to make one.

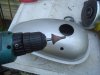
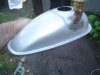
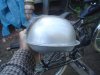
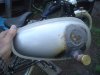
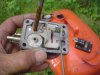
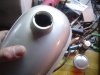
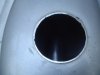
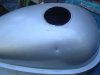
Pictures show what I did. Cut off the stock filler with a side grinder. If you don't have one you could remove it with a hacksaw and then a grinding bit on your drill to smooth it out.

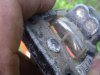
Then I made a little dent where I wanted the new filler to go. That's for keeping a drill bit from wandering on the curved surface to be drilled.

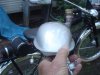
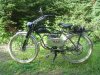
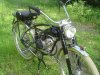
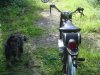
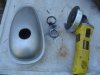
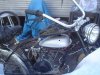
Then I set it in the frame to see what it looked like and be sure it actually fit.
So far, so good.
SB (cont)
 

Attachments

silverbear

The Boy Who Never Grew Up
Jul 9, 2009
8,325
670
113
northeastern Minnesota
Next up I drilled the pilot hole for the new filler with a bigger bit and started enlargening the hole to the size I wanted with a cone shaped grinding bit in the drill. I discovered pretty quickly that it was eating away the bit rapidly, so traced the new filler tube onto the tank with a marking pen and then ground it out with a less expensive grinding bit. I made it a tight fit.
My new filler is a 3/4" copper pipe fitting... a 45 degree elbow with a male threaded end and a brass hose cap. The plan was to plug the big opening in the top where the old filler got cut off with a cap made from a tin can lid. (Me and my tin cans.) And then solder the copper filler pieces together and then to the tank. Simple and would only take a few minutes... except for one thing. For the life of me I could not get the solder to flow into the tank metal. They did not like each other at all. I used a wire wheel to remove the paint, had bare metal to work with, plenty of heat, flux and silver solder... doing the same thing I've done with numerable V8 gas tanks, but no deal.

Dang. So I set it aside to contemplate a bit while doing other things. I realized then that I could probably do it OK with JBWeld epoxy. I've repaired old gas tank rust holes on tanks with JBWeld and it worked for that so why not? So that is what I have done. I applied the epoxy in two stages, letting the first coating dry completely before applying the second.

SB (cont.)
 

Attachments

silverbear

The Boy Who Never Grew Up
Jul 9, 2009
8,325
670
113
northeastern Minnesota
And this is as far as I have gotten on this little project. If there's time today I'll sand it down some and shoot it with primer and later a finish coat in black. Let it set for a few days and then shoot it with clear coat. Not so much for pretty, but to try to keep the inevitable gas drips and spills from eating the paint instantly (not from leaks, but from clumsiness). Then I'll use the tank for awhile to see how it is. The cap will be drilled in the center with a tiny hole for a vent. And that's it. In then end it is good that I couldn't solder the tank as this has given a different way to accomplish the same end for those of you who do not weld, do not yet know how to solder, don't have much money, but do have an extra peanut tank and an appropriate frame to put it in. Until the day you can afford one from Sportscarpat or have a welder and can make your own, maybe this simple tank modification will suffice. I'll follow up with photos later showing progress as it comes. By winter a spiffy copper tank will replace this cobbled one, but I hope this experiment is of use to somebody. At least I'll know it can be done and will have had the fun of doing it.
SB
 

Attachments

NunyaBidness

Active Member
Jun 29, 2008
1,062
2
38
memphis tn
Real nice SilverBear.
A few people that post here always get my attention when I see they have posted something. You sir are one of those folks.
 

silverbear

The Boy Who Never Grew Up
Jul 9, 2009
8,325
670
113
northeastern Minnesota
Thank you both for your kind words. I did paint the tank today after a little sanding... not much sanding as I am not too concerned with the finish since it is not a long term part of the build. Mostly I'm curious to see how it looks and feels. I did think some about a sight gauge from a boat gas tank I salvaged at the dump today. I think it could be altered to work on the peanut tank. It would be nice to look down at a little glass window to see what the indicator said. If there's any interest, I'll take pictures to show what the gauge looks like.
SB
 

silverbear

The Boy Who Never Grew Up
Jul 9, 2009
8,325
670
113
northeastern Minnesota
I skipped clear coat since I didn't sand down the epoxy goobers before painting. Went ahead and mounted it up and am trying to decide if I like it or not. Give it awhile, I guess. The filler tube could be made shorter by 1 1/2 inches or so by grinding or cutting off a bit from the copper pieces and removing about four threads worth of the male portion where the cap fits. It doesn't need to stick up as high as it does. The spot where the old filler was could be made to look virtually invisible by first bending down the edges of the hole before epoxying in the can lid so that it is below the rest of the tank surface at the top and then build it up to the same level and sand it out smooth. Just thinkin'. I may do another one with a different solder I just picked up which is 95% tin and 5% antimony. Still wondering why the solder would not flow into the tank steel. I'd be more inclined to solder it than use epoxy, but looks like the epoxy will work.
SB
 

Attachments

silverbear

The Boy Who Never Grew Up
Jul 9, 2009
8,325
670
113
northeastern Minnesota
This is the gas gauge hardware I was talking about.

First photo shows a donor boat gas tank from the dump. Leaning against it is the hardware containing the gas sight gauge.

Second photo shows the underside of that hardware piece which also has the fittings for gasoline and an air line to go to an outboard motor.

Third shows the little window with the end of the wire piece which indicates how full the tank is. At the other end of the wire rod is a cork which floats at whatever level the gas is in the tank. Just under the little glass window is an axis for the rod to pivot on. It is very simple and the rod can be bent or shortened or both.

Last photo shows the little glass window against the peanut tank, perhaps where it might be fitted. So this is what you would see, just the glass window since the metal piece which holds it against the hardware piece in the other pictures would be removed and bolted through the peanut tank from inside with easy enough access through the opening where the old filler was. You'd have to do this before the tin can plug was epoxied into place.

I don't know if I'll modify another one of these tanks or not. If I kind of like it on the Panther then I may do a better version and leave it that way. This is my demo bike for the EzMotorbike kit so it would be nice to show that the kit tank could be modified and even get a gas gauge. I'm pretty sure I'm going to use this gauge on my Indian build with a coffin shaped copper in frame tank. It would be different and doesn't cost anything but my labor. I also like that while riding I could just glance down to see how the fuel supply is holding up. Nice.
SB
 

Attachments

FarRider

New Member
Jun 8, 2011
134
0
0
Brooklyn N.Y.
Is it just me or is the standard peanut tank provided with most kits just the ugliest frigging thing on the planet?
No matter whats done to them, they still look like stamped tin. I once ground off and re welded the seam and it still looked like the big Ca Ca...
It was a nice cobble up job, but I've seen you do better with juice cans.
I want to see your copper tank!
FR
 

silverbear

The Boy Who Never Grew Up
Jul 9, 2009
8,325
670
113
northeastern Minnesota
No, it isn't just you. I wouldn't necessarily say it is the worst, but it surely isn't my favorite either. On some bikes it looks OK and on others ludicrous. One of the biggest problems is that there are a bazillion of them and we want our bikes to be different, custom.
I think tanks up to the grade of Sportscarpat's are top notch and beautiful. And a copper tank well made would be the cat's meow in my estimation... just a personal love of copper. Yet, a copper tank and a custom in frame tank made by an accomplished artisan are out of reach for many, probably for most of us. So this was admittedly an experiment in large part to see for myself if it could be done. It can and some might want to do it. I think it is always good to look at the options, especially when money is a big issue and to see what you can do with what you have. FR, I appreciate your honesty and this tank does not much ring my bells either. Ha! I want to see my copper tank, too, but it will be some time before that happens, probably in Tinsmith's shop next winter.
SB
 

FarRider

New Member
Jun 8, 2011
134
0
0
Brooklyn N.Y.
I'm thinking of a stretched workman style 4 stroke for my next build, It will feature a copper in frame tank and seat post tool box, maybe one of those cool brooks black saddles with the copper rivets? Rolled copper fenders?
Satin black and copper do look very good together...
Copper plated rims?
I'll be developing them all with in the next year as well...
Lets see what we can come up with.
As usual your a gentleman and a scholar.
Ride Free!
FR
 
Last edited:

NunyaBidness

Active Member
Jun 29, 2008
1,062
2
38
memphis tn
Copper and brass fittings, old school glass bowl-type inline filter, these are some of the things I think would look really good on a motorbike. A copper tank with a brass fitting that is attached to a copper line that feeds the carb and has an inline filter of the old brass and glass bowl kind.

Some day I will be able to put the motor bike together that is in my head, someday. In the meantime I will continue to watch and see what you guys are up to. Y'all just give me the greatest ideas and inspiration.
 

Tinsmith

Well-Known Member
May 15, 2009
1,056
259
83
Maryland
SB, Nice job as usual. Your ideas always get me thinking. I can see my worksman tank is in need of some kind of fuel guage, but you know me I just keep going until I run out of gas. Keep the ideas coming. Dan