Paint Disaster, Any Clues?

GoldenMotor.com

2door

Moderator
Staff member
Sep 15, 2008
16,302
175
63
Littleton, Colorado
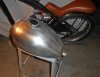
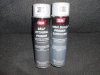
I've been painting stuff for a long time. I know the importance of a clean surface and how to prep bare steel for painting. I started with a clean fuel tank, sanded with 380 paper, cleaned with lacquer thinner then I used metal prep before shooting two coats of etching primer. The tank was allowed to dry for 48 hours before I sanded it with 400 and applied the heavy fill primer. About twenty minutes after shooting the fill primer I started seeing a defect appear in the tank, right behind the fuel cap bung.

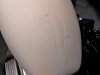
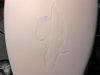
The longer it dried the worse the defect got until it looks like what the photos show. The only thing I did wrong was shoot the primer at a lower temperature than the directions on the can say. The manufacturer recommends that it be at least 65 degrees and it was only about 60 but there was good sunshine and the tank was in full sun during the initial dry time and warm to the touch from the solar heating. The two primers are made by the same company and is supposed to be used as I did; etching coat first then the heavy fill on top of it.

Any experienced painters here who might tell me, or have a theory about what happened? I'm going to sand the tank back down to bare steel and start over. I just don't want this to happen again.

Tom
 

Attachments

Mike B

New Member
Mar 23, 2011
2,256
7
0
Central CA
Wow, it looks like the fill primer just melted the base coat.

I think you put the fill on too thick. Try 2 or 3 thin coats.
 

2door

Moderator
Staff member
Sep 15, 2008
16,302
175
63
Littleton, Colorado
Wow, it looks like the fill primer just melted the base coat.

I think you put the fill on too thick. Try 2 or 3 thin coats.
It did look like it melted in. I applied three coats of the filler over the etching primer. I started with a mist coat, waited about a minute as per the instructions then another coat, wait, then the final coat.

I really feel that the first coats of the etch primer didn't have the heat necessary to harden off and the solvents in the filler coat attacked it. After the initial dry time with the etching primer I brought the tank in the garage when the sun started to go down and it hung in the garage where it was only about 55 degrees for two days.

Well, anyway, I spent the morning stripping and sanding the primer off and I'm back to square one with a bare steel tank. I'm not going to do anything until the weather warms a little. Too expensive to have the garage heated 24/7 and the fumes from this primer are intense. Nasty smelling stuff, for sure.

If anyone else has an idea, let me hear them. Thanks, Mike for yours.

Tom
 

Attachments

culvercityclassic

Well-Known Member
Sep 27, 2009
3,115
177
63
Culver City, Ca
Wow, it looks like the fill primer just melted the base coat.

I think you put the fill on too thick. Try 2 or 3 thin coats.

I agree with Mike.

I did some painting yesterday and the weather was the same as yours. My method was: 99 cent can of flat black paint from home depot (as my primer), water based air brush paint, left in my work truck with the heater blasting (lol) to heat and dry then while still warm shot the clear coat on. Added multiple coats of clear and put back in the truck to help setup and dry. Turned out nice....wee.
 

2door

Moderator
Staff member
Sep 15, 2008
16,302
175
63
Littleton, Colorado
Thanks, CCC.
I'll let you guys know what happens next time. All I need is for this winter to end and get some warm weather for a change.
Man this seems like a long winter.

Tom
 

ckangaroo70

Active Member
May 13, 2011
864
126
43
Central Illinois
Tom

When I saw your title "Paint Disaster", Lusterkote paint and its bad reaction to many types of other non Lusterkote primers came to mind, but I see this is not the case here. I found out the hard way on an airplane cowl that Lusterkote paint is not very friendly to some different brands of primer. Just wanted to share that for your future reference because I know that you are familiar with the Lusterkote paints. Most people will never come into contact with that brand, but of course I have a hobby cabinet full of it.

Anyhow..my guess would be that you just got your filler coats a bit to heavy and also the fact that the temperature was not warm enough. Filler primer if you watch it dry sorta has a tendency to expend as it drys to try find any imperfections and fill them as it expands. If the viscosity of the paint is too thick which can be caused by improper temperature...then the rate at which it expands and the evenness in which it flows is going to be hindered and thus the paint may just sort of puddle up in areas as it trys to expand and fill. I am not saying this is for sure what happened on your tank, but I have have similar experiences in the past trying to use filler primer in the cold on some of my model airplane aluminum parts in the past that I was trying to use filler primer to basicly eliminate some square corners. It kept sorta puddling on me after it looked like I was spraying even coats. I warmed the piece I was painting with my nebco heater and also warmed my can up with my heat gun. Worked fine after that. Just something you may wanna try.

I also have had bad experience trying to paint anything that has ever been polished or cleaned with a silicone based product. Once you get silicone on something you want to paint...it seems almost impossible to get that stuff cleaned off there even using mineral spirits or even acitone. If your tank had a gauge or scratch in that area that was exposeing bare metal before you sanded the tank down..then it is possible that someone used a silicone based cleaner to shine the tank. However if you know that the tank was not scraped in that area with any bare metal showing....then it is probably safe to assume that it would not be caused from silicone coming into contact with the raw steel.

Hope it works out better for you the next time. Looking forward to seeing the finished product.
 
Last edited:

2door

Moderator
Staff member
Sep 15, 2008
16,302
175
63
Littleton, Colorado
Ray, I'm almost certain it was temperature related along with maybe too heavy an application. I usually never try to paint anything unless it's 70 degrees or better. I got in a hurry on this because the bike looks so stupid with a silly liitle chrome kit peanut tank. It was the warmest day we've had for a long time and I really thought the sun would help. Guess I was wrong.

I won't try again until it warms up some and I'll just ride the thing and put up with the goofy looking tank. Thanks and yeah, I know about Lusterkote's incompatibility with some paints. I learned about that the hard way back in my R/C days. I remember the cowling on a scale F4-U Corsair. No fun getting that stuff off after it dried.

Tom
 

dracothered

New Member
Jul 25, 2012
973
1
0
Howell, MI.
I would say the temperature is the problem also. What you could do is build a heat box to keep what you painted the temperature you need it for it to dry and set. Prep it all inside in the heated area a plastic covered taped off area that will hold in the heat to make it the right temp to paint. Then after you sling the paint on put it in your heat box that will let the paint setup.

If your base cutting primer didn't set right it could have been releasing the solvent still because it hadn't flashed off totally yet. This solvent could of caused the defect that happened.
 

2door

Moderator
Staff member
Sep 15, 2008
16,302
175
63
Littleton, Colorado
Thanks, Drac. I'm fairly sure that was the case. The heat box is an good idea but I'll probably just hold off for a few weeks and paint the tank when it warms up a bit.

Tom
 

dracothered

New Member
Jul 25, 2012
973
1
0
Howell, MI.
Thanks, Drac. I'm fairly sure that was the case. The heat box is an good idea but I'll probably just hold off for a few weeks and paint the tank when it warms up a bit.

Tom
Yea, that would be the best since you don't need to do it because of a deadline or anything like that.
 

maniac57

Old, Fat, and still faster than you
Oct 8, 2011
4,484
22
0
memphis Tn
looks to me like the base coat skinned instead of curing, and the topcoat softened the base enough to allow it to slide and break apart. Temperature matters! The worst thing you can do (besides silicone) is to try rushing paint.
 

rhodeisland

New Member
Oct 30, 2012
83
0
0
Rhode Island
The previous coats did not flash off enough so the solvents in the later coats broke the skin and it slid.
I used two component epoxy when I fair out components but that would not be cost effective for one tank.
I would give the primer more flash times between coats the more the better because it will shrink in and also sand much easier with better results.
Welcome to the world of painting.
 

thegnu

New Member
Sep 15, 2011
982
1
0
freedom pa
that happens when your last coat "flash drys " an consecutive coat or coats soften your prior coat its called shrink a good way to avoid this is in low temps allow more flashout time or move to warmer temp .
 

2door

Moderator
Staff member
Sep 15, 2008
16,302
175
63
Littleton, Colorado
I believe its conclusive...I screwed up. I'm going to wait for a while. Supposed to be 70 here Friday. Maybe I'll get a primer coat on then.

Thanks a lot guys. I really appreciate the input.

Tom
 

thegnu

New Member
Sep 15, 2011
982
1
0
freedom pa
Tom it can happen in warm temps too if its too very hot in some cases its environment an in others forgive the pun pilot error . :p
 

2door

Moderator
Staff member
Sep 15, 2008
16,302
175
63
Littleton, Colorado
It's almost 60 today and lots of bright sunshine. I'm going to chance it and try to get a coat of etching primer on. Then, I'll let the tank rest, maybe put it somewhere it can stay warm for a few days before I put the filler coat on. It's supposed to be 70 here Friday. I'll post results.

Pilot error? Most probably :) I'm just glad I didn't have to report it to the FAA.

Tom
 

Master-shake

New Member
Feb 24, 2013
315
0
0
texas
you painted it too thick too soon. The stuff your seeing is where the :confused:molecules bound with each-other rather than the tank. Re sand the spot and put on light coats and wait for them to completely dry. hold the can about a foot aways as you coat it. don't overdo it as soon as you see the color of primer take over, stop. After about a 30minute -24 hour wait. re-coat.
 

tooljunkie

Member
Apr 4, 2012
663
5
16
Manitoba,Canada
i have to agree with the opinions here,Tom.
looks like solvents were trapped under the top coat.then it slid.

even if its 70 degrees outside,make sure the cans are warm too.
good luck,take your time.
 

2door

Moderator
Staff member
Sep 15, 2008
16,302
175
63
Littleton, Colorado
Got it primed today. OAT was in the low 70s. Lots of sunshine to help the flash off. It set up very nice. It's supposed to be even warmer tomorrow. I might try the black base coat, or just let the tank bake in the sun for another day. I don't need to rush this. I'm riding the bike with a goofy little kit tank right now.

Thanks again to all who have helped and made suggestions. I'll post finished photos in my chopper build thread.

Tom