Welding my mount to the engine.

GoldenMotor.com

stuckonreplay

New Member
Aug 14, 2012
74
0
0
Frederick, Maryland
This is my 3rd engine I will be buying, the reason why I have to buy a 3rd is because on the last two engines, the left front mount hole (yes, always the left), strips.

My previous two set-ups:

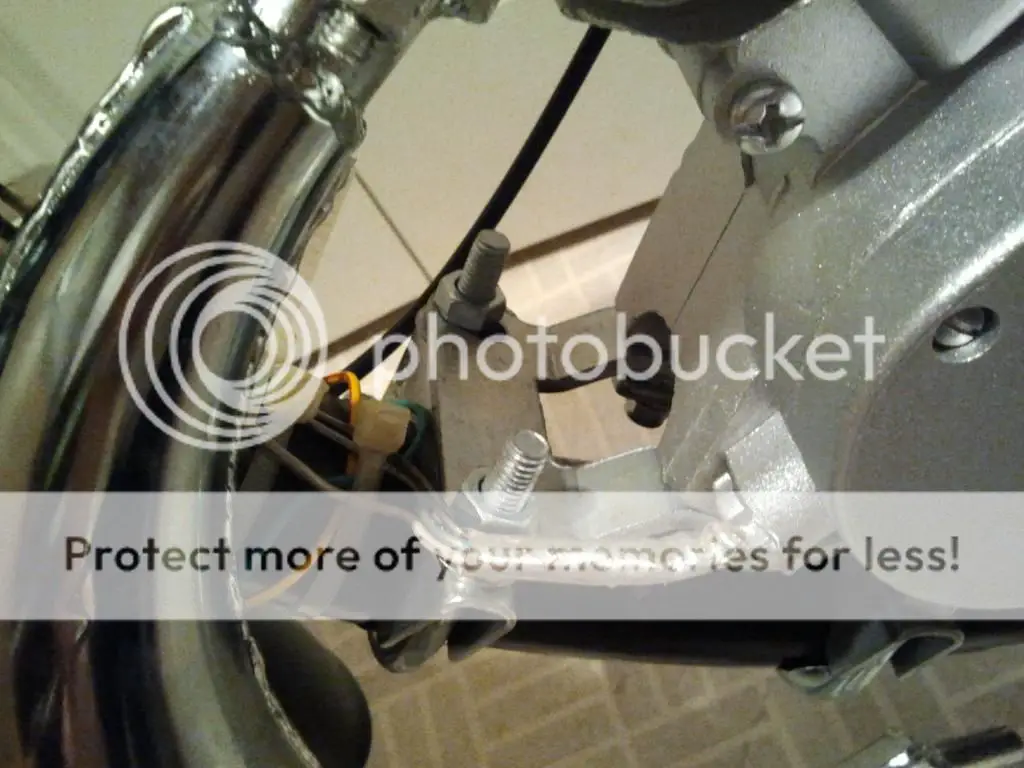
Universal U-bolt mount with blue loctite - worked for the time being, then after 10 miles, came loose/stripped.

My game plan for the 3rd engine:

This engine will be brand new - here is my plan. Universal U-bolt mount with metal pallet support beneath the U-bolt, GREEN loctite in front mount bolts, and finally, weld the mount to the engine, not the bike.

I know your thinking why I would use the bolts if I was welding but wouldn't that encourage cracking inside the vacant holes while riding?

I would like some advice on what to do and if you think my plan will work, thanks.
 

2door

Moderator
Staff member
Sep 15, 2008
16,302
175
63
Littleton, Colorado
Good luck welding steel to aluminum.
Is there any way we can disuade you from trying this scheme?

First of all you're going to ruin the engine case.
Second, there's something else going on as to why you're breaking fasteners. Are you trying to use rubber between the engine and the frame? Are the engine mounting points making full contact with the frame? They must, with no gaps. Is the engine centered on the frame tubing? Is your chain properly aligned and tensioned?
Are you overtightening the fasteners?
You have something wrong. Welding the mount to the engine isn't the way to fix it.

Tom
 

stuckonreplay

New Member
Aug 14, 2012
74
0
0
Frederick, Maryland
Good luck welding steel to aluminum.
Is there any way we can disuade you from trying this scheme?

First of all you're going to ruin the engine case.
Second, there's something else going on as to why you're breaking fasteners. Are you trying to use rubber between the engine and the frame? Are the engine mounting points making full contact with the frame? They must, with no gaps. Is the engine centered on the frame tubing? Is your chain properly aligned and tensioned?
Are you overtightening the fasteners?
You have something wrong. Welding the mount to the engine isn't the way to fix it.

Tom
I'm glad you stopped by, to answer your questions:

No rubber between engine and frame, just screw, locknut, and mount, and engine.

And the centering problem is probably the issue, on the last two engines I had to slightly turn the rear wheel in to align the chain.
 

bigbutterbean

Active Member
Jan 31, 2011
2,417
3
38
Lebanon, PA
I'm glad you stopped by, to answer your questions:

No rubber between engine and frame, just screw, locknut, and mount, and engine.

And the centering problem is probably the issue, on the last two engines I had to slightly turn the rear wheel in to align the chain.
The engine should be aligned in the frame properly, and the way I do it now (might take a little practice, cant remember if I was able to do it accurately the first few times or not), is to look towards the seat tube (the section of the frame that comes down from the seat) from the area of the back wheel, and look at the frame tube and the sides of my engine case where the covers are and see if they look level with the seat tube. I then tighten each nut and bolt on the rear engine mount till they are just snug, then I snug up the front engine mounts, not tightening the whole way, just until I can tell that they are tightening, and then look at the angle of the engine compared to the seat tube again. if the engine appears to be leaning more to one side, I loosen up the front engine mount on the side its leaning towards. when all the bolts are snugged up and the engine is staying level, I then begin to tighten each mounting bolt a little at a time, still keeping an eye on the angle of the engine. dont overtighten one fastener too much, try to tighten them all evenly. also, as 2door said, you cant weld steel to aluminum.
 

stuckonreplay

New Member
Aug 14, 2012
74
0
0
Frederick, Maryland
The engine should be aligned in the frame properly, and the way I do it now (might take a little practice, cant remember if I was able to do it accurately the first few times or not), is to look towards the seat tube (the section of the frame that comes down from the seat) from the area of the back wheel, and look at the frame tube and the sides of my engine case where the covers are and see if they look level with the seat tube. I then tighten each nut and bolt on the rear engine mount till they are just snug, then I snug up the front engine mounts, not tightening the whole way, just until I can tell that they are tightening, and then look at the angle of the engine compared to the seat tube again. if the engine appears to be leaning more to one side, I loosen up the front engine mount on the side its leaning towards. when all the bolts are snugged up and the engine is staying level, I then begin to tighten each mounting bolt a little at a time, still keeping an eye on the angle of the engine. dont overtighten one fastener too much, try to tighten them all evenly. also, as 2door said, you cant weld steel to aluminum.
So I should just screw the bolts in with red or green loctite? Also, should I use a lock nut with the bolt or just the bolt itself? And how tight should it be?
 

2door

Moderator
Staff member
Sep 15, 2008
16,302
175
63
Littleton, Colorado
So I should just screw the bolts in with red or green loctite? Also, should I use a lock nut with the bolt or just the bolt itself? And how tight should it be?
DO NOT USE RED LOCTITE!!! You'll regret it if you ever need to get that stud out of the case.
Personally I don't use the studs. I replace the engine mounting fasteners with Allen head cap screws. They are 6mm x 1 thread and available at most hardware stores. You'll need to measure for the correct length depending on your frame tube diameter.

Use one flat washer and one lock washer under the heads. You'll need a 5mm Allen (hex) wrench. If you don't own a torque wrench, you should. They aren't that expensive and can save you a lot of headaches. Torque the fasteners down to 60 to 80 inch pounds.

If you feel safer using a thread locking product, they aren't necessary, then use the blue, #242 Loctite or an equivalent.

If the engine mounts (saddles) fit flush against the frame it should be self centering. There shouldn't be any appreciable side to side movement if the mounts are flush, snug, against the frame tubes. Some installations require some grinding in the saddles to get a good fit.

Make sure your chain and sprockets are properly aligned. Lateral misalignment can put a lot of stress on the engine mounts as well as the chain, sprockets and tensioner if used. Chain alignment is one of, if not the most important aspect of the installation.

Tom
 

stuckonreplay

New Member
Aug 14, 2012
74
0
0
Frederick, Maryland
If the engine mounts (saddles) fit flush against the frame it should be self centering. There shouldn't be any appreciable side to side movement if the mounts are flush, snug, against the frame tubes. Some installations require some grinding in the saddles to get a good fit.

Make sure your chain and sprockets are properly aligned. Lateral misalignment can put a lot of stress on the engine mounts as well as the chain, sprockets and tensioner if used. Chain alignment is one of, if not the most important aspect of the installation.

Tom
Acknowledged everything you said until here, what do you mean by it being flush to the frame?
 

2door

Moderator
Staff member
Sep 15, 2008
16,302
175
63
Littleton, Colorado
Acknowledged everything you said until here, what do you mean by it being flush to the frame?
The semi-circular areas of the engine mounts that are cast into the case.
The angle of the bike frame tubes and those saddles should match so there is a snug fit when the engine is set into place in the frame.
There is an old thread posted by Al Fisherman, with photos explaining this important aspect of installing the engine. I'll see if I can find it and post it here for you.

Tom
 

stuckonreplay

New Member
Aug 14, 2012
74
0
0
Frederick, Maryland
The semi-circular areas of the engine mounts that are cast into the case.
The angle of the bike frame tubes and those saddles should match so there is a snug fit when the engine is set into place in the frame.
There is an old thread posted by Al Fisherman, with photos explaining this important aspect of installing the engine. I'll see if I can find it and post it here for you.

Tom
Oh you thought I used the stock front mount, I am using the U-bolt method with the bracket up for more clearance. It looks like the one in the picture except my bracket will be flipped up:

courtesy of SBP
 

2door

Moderator
Staff member
Sep 15, 2008
16,302
175
63
Littleton, Colorado
Ahhhh, I stand corrected, at least 50%. The rear mount still needs to fit the seat tube snuggly. The trick is to get everything true and square before tightening the fasteners.
I've never been a fan of clamps. They are too prone to slipping if not torqued correctly and checked periodically for tightness.
I prefer a welded front mount on curved cruiser downtubes but I also realize that welded mounts are not something everyone can do. The SBP mount is a good alternative if installed correctly with attention to alignment.

Keep us informed and let us know how you do with this installation.

Tom
 

rustycase

Gutter Rider
May 26, 2011
2,746
5
0
Left coast
...as Tom is describing the mounts fitting snugly to the frame, I took particular care on my first rebuilt motorized bicycle.
Things worked out fine with the front mount, and I used a chainsaw file to dress the inside of the rear motormount so it fit very well up against the seatpost.
It took more than a few attempts, but I got it just right.
Never, had a single problem, or even a nut or bolt coming loose, in the life of that motorized bicycle.

The rear mount is the most important on a chinagirl, as this is where the poser of the engine is applied to the frame. The front is merely locating the powerplant and stabilizing it. NOT the best of designs, there really should be a third mounting point, but that's the way it is...
If you are experiencing a continuing problem with the front mount, something is seriously out of alignment or there is a lot of frame flex.
Perhaps you might gusset the frame???

Best
rc
 

stuckonreplay

New Member
Aug 14, 2012
74
0
0
Frederick, Maryland
Ahhhh, I stand corrected, at least 50%. The rear mount still needs to fit the seat tube snuggly. The trick is to get everything true and square before tightening the fasteners.
I've never been a fan of clamps. They are too prone to slipping if not torqued correctly and checked periodically for tightness.
I prefer a welded front mount on curved cruiser downtubes but I also realize that welded mounts are not something everyone can do. The SBP mount is a good alternative if installed correctly with attention to alignment.

Keep us informed and let us know how you do with this installation.

Tom
I went ahead and just bought the motor and will show pics of my setup before I use any loctite, 3rd party bolts, etc. Will post back in a couple of days.
Thanks alot 2door
 

stuckonreplay

New Member
Aug 14, 2012
74
0
0
Frederick, Maryland
...as Tom is describing the mounts fitting snugly to the frame, I took particular care on my first rebuilt motorized bicycle.
Things worked out fine with the front mount, and I used a chainsaw file to dress the inside of the rear motormount so it fit very well up against the seatpost.
It took more than a few attempts, but I got it just right.
Never, had a single problem, or even a nut or bolt coming loose, in the life of that motorized bicycle.

The rear mount is the most important on a chinagirl, as this is where the poser of the engine is applied to the frame. The front is merely locating the powerplant and stabilizing it. NOT the best of designs, there really should be a third mounting point, but that's the way it is...
If you are experiencing a continuing problem with the front mount, something is seriously out of alignment or there is a lot of frame flex.
Perhaps you might gusset the frame???

Best
rc
Frame should be fine, bike is new. I need to do some adjustments to the alignment
 

2door

Moderator
Staff member
Sep 15, 2008
16,302
175
63
Littleton, Colorado
This is what I did and removed half of engine vibration,earlier had the muffler clamp and to work well, but I had to take the frame to the muffler shop to weld the back and I asked him to do this engine mount.brnot
The third photo from the left shows the reason you had problems. There should not be any rubber or resilient material in the mounts between the engine and the bike frame. It will not eliminate vibrations but will only transmit them to the mounts and fasteners.
Your welded design is the way to go.

Tom
 

GAS+RIDEZ

New Member
Mar 31, 2011
117
1
0
Puerto Rico
2 door I read your advising the engine should be mounted without rubber, but in my case the clamp is loose in the frame and for that I place the rubber inbetween frame and clamp,thank God it was resolved with the frame motor mount that is in the photo.Thanks
 

stuckonreplay

New Member
Aug 14, 2012
74
0
0
Frederick, Maryland
Alright guys i'm back and just finished her up.

Fedex dropped the engine off at 5:00 and I busted my arse until 9:00 to get it right, here are some pics with explanations.


NOTE - I decided not to mess with any studs or screws, I am using stock studs and nuts and NO loctite of any type.


Front of the two mounts:


Rear of the two mounts:
[/IMG]

Both mounts with metal pallet support:


Standard rear mount:


Chain alignment: might seem a tad crooked on camera but pretty straight
 

2door

Moderator
Staff member
Sep 15, 2008
16,302
175
63
Littleton, Colorado
Everything is looking good, so far. Let us know how it goes and if we can help with anything else.
The chain alignment looks near perfect.
Good luck. keep us posted.

Tom
 

stuckonreplay

New Member
Aug 14, 2012
74
0
0
Frederick, Maryland
Everything is looking good, so far. Let us know how it goes and if we can help with anything else.
The chain alignment looks near perfect.
Good luck. keep us posted.

Tom
Thanks again. But I have a question. I attached the chain to the sprocket, pulled the clutch, and moved the bike forward and it turned but very hard and stopped sometimes. It is probably because it is right out of cold storage. So, will it just break in and will it effect my riding?
 

2door

Moderator
Staff member
Sep 15, 2008
16,302
175
63
Littleton, Colorado
How's your chain tension? You want it to be 1/2 to 3/4" of slack. You measure this by leaving the clutch engaged and gently rolling the rear wheel forward until the piston comes up to a compression stroke. At that time the upper chain run will go slack. That's where you measure.
A chain that is too tight or too loose can bind. That might be what you're feeling.

Tom