

I'll begin this thread with a short explanation of what I have been tinkering with for quite some time. Nearly a year ago I purchased a Worksman Industrial frame, and last August at the Central Pa Rally took the frame and talked with RusticoRay, Jay, Quenton and alot of the other guys there about what I wanted to do. I purchased the HS/EZM kit at the rally from Jay and began exploring the options. I have been reading on this site and taking notes ever since. It was obvious that the frame needed to be altered for the EZM/HS to fit. I know there have been others who have shown how they have stretched their frames and I thank you all for the info although I can't remember who it was specifically. Anyway, I did a few practice runs on bending 1" tubing for a drop-loop frame and wasn't satisfied with the results. I have a friend with a "big boy" type tubing bender but he doesn't have the dies for anything that small and they aren't cheap. If I were going to get into doing this often I would purchase them, but they are cost prohibitive at this point. Later in the fall I went to a local estate auction because they had advertised an old Schwinn bike. Turned out to be a 1951 girls Schwinn. I kept looking at it thinking it might be possible to remove one of the two down loop pieces and stick it in the Worksman. I didn't have any way to measure anything so I went ahead and bought it for $30. Brought it home, cut out one of the loops and laid it on the Worksman and it fit perfectly. Went on to cut out the worksman frame and stretch in 4". I'm gonna leave it at that for now and will try to get a couple pics up later tonight. I didn't take and step by step photos because I wasn't planning on doing a thread, but maybe the photos I have along with some explanation will help someone else.
Worksman/EZM Stretch
- Thread starter Tinsmith
- Start date

Isnt that a killer Tinsmith?... these tools to do this right cost a fortune.
I'm a big fan of your in frame tin gas tanks and metal work... Please check out my copper pipe gas tank, muffler and light bar... you inspired them.
http://motorbicycling.com/f42/iron-horse-gt5r-china-girl-build-30625.html
I cant wait to see how you pull off the Workman/HZ stretch job.
FR
I'm a big fan of your in frame tin gas tanks and metal work... Please check out my copper pipe gas tank, muffler and light bar... you inspired them.
http://motorbicycling.com/f42/iron-horse-gt5r-china-girl-build-30625.html
I cant wait to see how you pull off the Workman/HZ stretch job.
FR
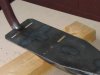
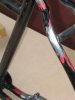
Thanks for the interest guys, I hope there are some things I have done that might help solve some problems for others. FarRider has a point about the equipment to do some of the work, but it's guys like Silverbear and his bunch who figure alot of this stuff out even though they don't have access to the tools that have inspired me to try. First, I do have the equipment available and have been working with metal going on 30 years so that helps alot, but SB just modified a worksman frame for $45 I think. The first photo is the worksman industrial after I inserted the girls bike front tube and lengthened the frame 4" to get the HS/EZM as far forward as I could. I cut the top two horizontal tubes in the center and the front tube was cut off at the head tube and crank tube. Hope my nomenclature is close. Anyway, as I said before the Schwinn girls section fit up almost perfectly. What I did to lengthen the frame was use 4" pieces of the worksman section I cut out. I turned plugs on a lathe to the inside diameter of the tubes and left a small gap between the pieces to fill with weld. I am not a good welder, and the welder where I work said the plugs aren't really necessary. I felt it gave me more chance to get it back together straight and get a better weld. I don't think SB stretched his but I'm pretty sure that plugs weren't used to join his frame back up. The second picture is of the motormount I made installed. It's just a 2 piece T-shaped affair. I tried to figure out just enough height to squeeze the motor in and get it as far forward away from the pedals. It looks like I got that pretty much right as you'll see later with the motor mocked up. I tack welded the two pieces together and tacked it to the frame so I could get the motor where it needed to be and marked the mounting holes for the motor. I was able to put side-to-side slots in the mount to make it easier to line the drive chain up, but I've seen many guys just drill holes where they are needed. Once I thought I had it I welded the mount to the frame. I'm gonna stop with that cause I gotta get up at 5 and I'm gettin' old.
Last edited:
Here are the photos.
Attachments
-
 85.9 KB Views: 330
 -
 74.9 KB Views: 313
This will be an interesting thread. You do nice work. Will you have it finished for my rally in August?
Jay
Jay
Nice neat piece of work... looks clean. Theirs nothing wrong using the frame tube plugs your right it will make getting the tubes straight easier with the plugs than with out, the slight weight is negligible.
Thats a long frame... how about a pic of the full frame in primer?
Its very cool.
FR
Thats a long frame... how about a pic of the full frame in primer?
Its very cool.
FR
Last edited:
")
")
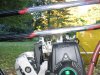
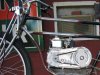
The next pictures are of my widening of the chainstay . With the motor sitting low and far forward I thought a little more clearance for the drive chain would help so I cut the two chainstays behind the bottom bracket and welded in a piece of flat stock and set them out a bit. When I did that it wanted to throw the back end at the dropouts inward. I took a piece of all-thread, a couple nuts and washers slid it in the dropouts and ran them out to the proper width. The photo of the top end of the seat stays is something I had to do to get the dropouts plumb with each other. Before I ever started this project I had the frame on the workbench at work and noticed it wasn't right. The only way I could see to fix it was to cut the left side seat stay from the seat tube and drop it down a little. It still isn't perfect, but will do and won't show being under the seat. I'll throw in a couple of pictures of the initial motor mock-up so you can see how it looks. I probably won't have anymore pictures this week. I'm planning on starting to put it together this weekend. I will take more pictures and post them the first of the week when my IT specialist returns from visiting Grandbaby!
Attachments
-
 87.4 KB Views: 278
 -
 78.9 KB Views: 320
 -
 145.2 KB Views: 336
 -
 138.1 KB Views: 463
Tinsmith, if that bike has lines even half as pretty as what you've shown so far, my drool might short the keyboard.
I've seen this bike in process and am looking forward to it in paint now... and then hearing about that first ride. Those welds are so good in the stretched section... you'd never know they were even there.
Yes, the Schwinn ladies frame front down tube is just right for opening up the Worksman frame. Stock, you can barely fit a happy time motor in it. Yours looks so right it appears it must have come that way. I helped keep the price from my welder down ($45.00) by cleaning up the weld areas first with a wire wheel to remove the paint and said I would happily clean up the welds afterwords if it would save him time (and me money). I did cut the Schwinn part loose and stripped it to bare metal, but left the Worksman frame intact, figuring the welder would know best where he wanted to cut and join. The welder commented on the quality of the steel he had welded. I thought he meant the Worksman, but he was referring to the Schwinn down tube and wanted to know what it came from.
SB
Being a fool for copper, I like what you have done. I've been making little copper jewel lights for a couple of years now and use stained glass jewels for the lenses. But what rings all my bells is your copper gas tank. I've pictured that very tank for some time, but couldn't even consider making one due to the expense of the copper fittings. There won't be many of those around. That sir, is the cat's meow.Isnt that a killer Tinsmith?... these tools to do this right cost a fortune.
I'm a big fan of your in frame tin gas tanks and metal work... Please check out my copper pipe gas tank, muffler and light bar... you inspired them.
http://motorbicycling.com/f42/iron-horse-gt5r-china-girl-build-30625.html
I cant wait to see how you pull off the Workman/HZ stretch job.
FR
SB
Well, I apologize again for the photos last night. They were from some time ago and I resized them for the post and they looked good on this end but as you can see a good bit of them is missing. I had planned to take new photos tonight and try to post, but have been at the hospital getting stitched up. Gonna be one handed for a short while. Don't ask, cause I ain't tellin'. I'm gonna get ragged on at work enough tomorrow. What I hope to do is get some new photos over the next couple days with everything mocked up and then the first of next week when the brains of the household returns I'll have more pics and commentary. Sorry I'm off to such a rough start but at SB says, I am computer impaired, but will prevail and get caught up next week. Thanks for the interest I hope some of it will be helpful. Dan
Dan,
The photos will wait and so will the thread. So sorry to hear you've hurt your hand badly enough to require stitches. Not good. Heal up, buddy.
SB
The photos will wait and so will the thread. So sorry to hear you've hurt your hand badly enough to require stitches. Not good. Heal up, buddy.
SB
High praise indeed coming from you SB, thanks.Being a fool for copper, I like what you have done. I've been making little copper jewel lights for a couple of years now and use stained glass jewels for the lenses. But what rings all my bells is your copper gas tank. I've pictured that very tank for some time, but couldn't even consider making one due to the expense of the copper fittings. There won't be many of those around. That sir, is the cat's meow.
SB
I'd have never thought of copper for the gas tank with out my good buddy George the plumbers input, he donated the 8"long section of 4" pipe, meant for use as a water main for a large apartment building and the 4" end caps.
Thanks George...
The gas tank has caused such a stir that I've built and sold 5 of them in various sizes, the price of the raw materials at several different plumbing supplies stores is around $100...pricey I know, considering the work it took to put one together, but I feel it's worth it for something unique.
Copper jewel lights?
I'm intrigued, as you can see from that album I'm also working on a convertible lighting bar made from copper pipe fittings. Hows about firing me off a few pics of those baby's? I'd like to see them, if you did em, there probably cool. Hmmmmm, 2 small red ones as tail lights perhaps?
Now, if I can just get my home built generator/battery charging system to work correctly Ill be in business.
Thanks again,
FR
Last edited:
FarRider, Went and looked at your work on the copper tank and light bar. I can see why folks want one. Very well done. I may be headed up your way sometime in the near future. We have some elderly friends in Bklyn ( Much older than me even). I will check with the ITspecialist/events planner when she returns. We would probably only be there for a saturday overnight maybe but maybe we could meet for lunch or something. Keep up the good work. Dan