First Build Thread - BTR Inspired Cruiser

GoldenMotor.com

GasX

New Member
Oct 7, 2011
277
0
0
Florida
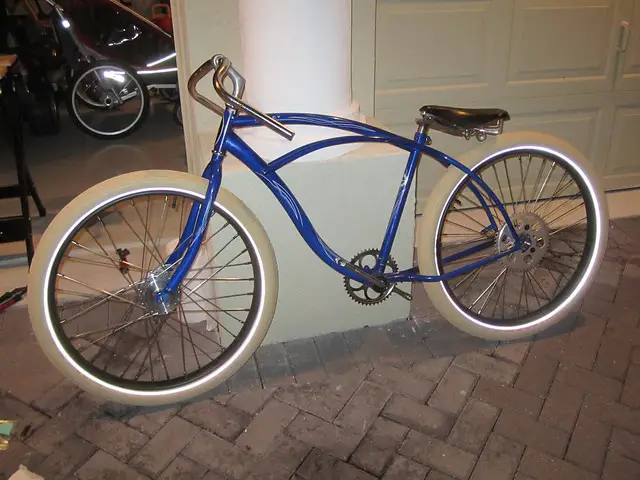
Finally getting around to starting my build thread. It's my first foray into motorized bicycles and I am jumpin in with two feet. I bought a junker Schwinn Legacy 26" Cruiser off a Craig's List add and have gone on from there.

Link to Flickr album

I'll be posting pics directly once I get to thirty posts and will yammer on about the trials and tribulations along the way.
 

GasX

New Member
Oct 7, 2011
277
0
0
Florida
I started off by dismantling everything and getting the little bits cleaned up. Yesterday I realized I had to partially put it back together to figure out where everything was going to go prior to paint, so I put a minute amount of grease on all the bearings and assembled a rolling chassis.


I discovered a number of challenges along the way:
1. will have to figure out how to secure the front drum brake arm. It sits 1/2" from the fork tube.
2. The front wheels did not come with the nuts to lock it onto the frame. When I used the ones from the rear wheel, they would not advance more than 3 or four turns. The axle is either stripped or it is residual locktite...
3. I will probably need some spacers for the rear as the frame bends quite a bit when I tightened the bolts


I also spent an inordinate amount of time figuring out how to mount the rear dropout kickstand only to eventually learn after scratching it up that it does not work with this frame...
 

darkhawk22

New Member
Aug 17, 2010
733
8
0
Acworth, GA
My rear dropout kickstand didn't work the best either. I ended up bending the small tabs in and flipping it over. It's loose until you get everything locked down. I usually get my wheel adjusted and tightened slightly until it's secure enough not to move. Then I put the bike up on the stand and lock it down tight. You could also drill and tap a small hole in the drop out for an additional bolt to hold it in place. I'll probably do that in the near future.
 

Attachments

Last edited:

GasX

New Member
Oct 7, 2011
277
0
0
Florida
Thanks for posting the pic - very helpful.

Yesterday, I rounded up a lot of miscellaneous parts - new gas line, wires, connectors, mounting hardware, etc and set about modding the mounting plate. Since the downtube is too wide for the plate, I ground out the bolt holes to accomodate a wide U-bolt. Consequently, I was able to mock mount my engine to get a look at clearances.

I learned I need to further mod the mount to lower it more and that I have to source either a wide 1 piece crank or a whole new 3 piece BB/crank set-up.

Also, I assume the black box in the third picture is a muffler? It's almost a shame to remove it to mount the exhaust pipe as I like the look of its cover.
 

Attachments

GasX

New Member
Oct 7, 2011
277
0
0
Florida
Well, I put the mount on the frame and finally got to ride my bike around the cul de sac tonight - under my own power. Learned that rear brake straps need to be attached. Noticed that the rear wheel has a wobble. The axle is well tightened onto the frame, but the hub wobbles between the sprocket and brake arm. Have to figure out how to deal with that. Here is where I am with my build:

1. I need shorter or wider cranks to clear the engine. Will probably go with shorter as that is a cheaper option.
2. I need to figure out how to get rid of the rear hub wobble mentioned above.
3. Need to beef up the front drum brake mount as the hose clamp is definitely deforming under braking.
4. Need to mount the engine and hook everything up. - I'd like to try and start the engine tomorrow.
5. I also need to find a better mounting plate option. I am not going to be satisfied with my kit mount. Might call that a long term goal and get the bike running though...
 

GasX

New Member
Oct 7, 2011
277
0
0
Florida
Just out of curiosity which motor kit option did you go with and what transmission? Thanks! Build looks good so far.
I was scanning eBay and came across a 4 stroke engine kit auction that was about to end that noone had bid on. I got it for $200 plus $50 shipping. It's a great deal regardless, but the engine mount is a complete piece of garbage, there were no instructions and a few other niggling little things about it. Also, it's a Hoot transmission.

Still, if I get it up and running, I'll get my money's worth.
 

GasX

New Member
Oct 7, 2011
277
0
0
Florida
So, I went ahead and threw most everything on the bike to help anticipate my next wave of issues. No shortage of issues identified.
1. The engine mount is even more of a piece of crap than I first thought. The mounting plate holes don't even line up with the engine. Seriously, it's an easay fix with the grinder, but it's a disgrace...
2. I need to flip the sprocket to minimize the chance of chain rub on the Fat Franks
3. The chain is binding up on the sprocket (see photo below at 3:00). This is an expensive aftermarket sprocket, so I am frustrated. Perhaps the kit chain is to blame?
4. Another niggling little thing: the nuts provided for the tank are too large. The wax (or whatever it is) that makes it a "locknut" is the only thing holding that tank on at the moment.

I plan to take the rear wheel to a bike shop to have the hub wobble looked at and will flip the sprocket at that time...
 

darkhawk22

New Member
Aug 17, 2010
733
8
0
Acworth, GA
If it's a manic or pirate sprocket you'll probably need a beefier chain. I believe my 2-stroke kit came with the 415 chain which has worked great and it's much thicker/wider than a standard bicycle chain.
 

GasX

New Member
Oct 7, 2011
277
0
0
Florida
If it's a manic or pirate sprocket you'll probably need a beefier chain. I believe my 2-stroke kit came with the 415 chain which has worked great and it's much thicker/wider than a standard bicycle chain.
Yes, it's a pirate sprocket. The chain that came with the kit is much beefier than the bike chain...
 

GasX

New Member
Oct 7, 2011
277
0
0
Florida
Well, I'll get a few mm by flipping the sprocket over. I'll look at bending the brake arm to allow room for a spacer too.

Thanks for the idea.
 

Scootmeister

Member
Mar 15, 2011
243
5
16
North Carolina
Hi GasX. Looks like you are making good progress. Part of the fun is learning better ways to do old things. Two suggestions, I'd replace the hose clamp on the brake lever with a good muffler clamp the size of the frame ( maybe $1.50). It will be 4 times stronger and will stay in place much better. Second, I don't have direct experience but have been told that recessed seat posts put excess stress on the downtube of the frame and either crack it or pull it loose from the weld. The ususal stress on a seatpost is down, not lateral. I've heard this even happens on heavy duty Whizzer frames. Just a couple of thoughts cause I'd rather be riding than repairing!!
 

GasX

New Member
Oct 7, 2011
277
0
0
Florida
Hi GasX. Looks like you are making good progress. Part of the fun is learning better ways to do old things. Two suggestions, I'd replace the hose clamp on the brake lever with a good muffler clamp the size of the frame ( maybe $1.50). It will be 4 times stronger and will stay in place much better. Second, I don't have direct experience but have been told that recessed seat posts put excess stress on the downtube of the frame and either crack it or pull it loose from the weld. The ususal stress on a seatpost is down, not lateral. I've heard this even happens on heavy duty Whizzer frames. Just a couple of thoughts cause I'd rather be riding than repairing!!
I already bought some vinyl coated clamps to experiment with. Down the line, I'll get a custom fork with a welded on stud.

Regarding the seatpost, yourt point is well taken. My sportsman flyer model arrived today. I'll compared the two posts and settle with the one I like best and feel safest using.
 

kevyleven007

Active Member
Sep 25, 2008
1,217
8
38
texas
I started off by dismantling everything and getting the little bits cleaned up. Yesterday I realized I had to partially put it back together to figure out where everything was going to go prior to paint, so I put a minute amount of grease on all the bearings and assembled a rolling chassis.


I discovered a number of challenges along the way:
1. will have to figure out how to secure the front drum brake arm. It sits 1/2" from the fork tube.
2. The front wheels did not come with the nuts to lock it onto the frame. When I used the ones from the rear wheel, they would not advance more than 3 or four turns. The axle is either stripped or it is residual locktite...
3. I will probably need some spacers for the rear as the frame bends quite a bit when I tightened the bolts


I also spent an inordinate amount of time figuring out how to mount the rear dropout kickstand only to eventually learn after scratching it up that it does not work with this frame...
whatever you do dont buy a kickstand from bgf.nothing but junk. p.s.Thats a REALLY nice bike!You know,when I envented the upside down handlebar trick I really didnt think it would take off like this.now I'm ashamed to admit I envented it
 
Last edited:

dmb

Active Member
Dec 4, 2010
1,354
3
36
lakewood ca
ya! when i was a kid in the 50's i invented the nut buster... pretty sure because i don't remember being warned before that happened to me. that. thank god never got real popular after the first one!