Coleman tank for 50 Schwinn straight bar

GoldenMotor.com

silverbear

The Boy Who Never Grew Up
Jul 9, 2009
8,325
670
113
northeastern Minnesota
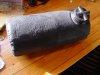
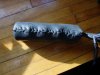
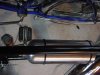
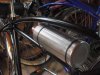
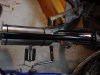
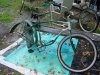
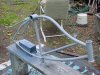
I was going to jump right in to the Coleman fuel tank and then thought it might be better to give a little background. First off about a month ago I had the good fortune to find a skip tooth Schwinn at the local dump (OK, Sanitary Refuse Transfer Station or something like that... they have a metal pile which I always look through). I got it home and took a picture, studied it and thought I found a picture of it in a Schwinn book I have. I thought it was a DX model as the paint job looked right and being a skip tooth I figured it was pre-WWII. Whatever it was, I knew I liked it and saw that the frame and front fork were perfect. So, I stripped it down to bare metal, primed it and gave it a paint job with black engine enamel, Dupli color as suggested by several people here on the forum. I took the original seat apart, wirebrushed the metal, gave it some additional padding and upholstered it with black elk hide which I had on hand for making moccasins. While I was at it I covered an old lawn mower cylindrical tank in the same leather figured to mount behind the seat. To be continued...
 

Attachments

silverbear

The Boy Who Never Grew Up
Jul 9, 2009
8,325
670
113
northeastern Minnesota
So, it was coming together. I learned from VeniceBoy and BarelyAWake that what I had was actually a 1950 Schwinn Straightbar Hornet, a frame also shared with the Panther model. Cool. Now I knew what it was and when it was made down to the month and day. Thank you, guys! I was liking the bike more and more as it went along. I ordered a front badge for an American Flyer and a new sprocket in the same "sweetheart" pattern as the original, but with the modern tooth pattern. I liked the leather covered tank and made leather covers for the hand grips which turned out pretty nice, but I still wanted a bigger gas tank and wanted to do something with that space between the crossbars. While thinking about it I found an old feather chain guard on eBay and also a NOS rear rack. I have yet to straighten out the chain guard, but the rack is mounted and looks really good. I had been thinking about using a fire extinguisher for a fuel tank to fit between the crossmembers... tried mine and found it was too big. Then a few days ago I was in a tractor supply store and saw a Coleman fuel tank which looked about right. I took it with me to the plumbing department and discovered that a 3/4" male copper pipe fitting screwed in to the end of the tank. I picked up a couple of elbows and a female fitting for the filler cap to fit in to. Here are some photos showing it along with a leather handgip and the little leather covered aluminum tank for behind the seat.
SB
 

Attachments

Kevlarr

New Member
Jul 22, 2009
1,628
4
0
Mi
Three questions silverbear,

1. What about a breather? With the setup you have there there's no way for air to get back into the tank.
2. How are you going to install the fuel line? Those bottles are aluminum and thin so tapping into the side or even the bottom isn't going to work.
3. Why didn't you buy the red one? :p
 

silverbear

The Boy Who Never Grew Up
Jul 9, 2009
8,325
670
113
northeastern Minnesota
I removed the 'Coleman' logo with very fine steel wool and discovered that the aluminum underneath shined up pretty nicely, so I shined the whole thing. I found a 3/4" cast iron plug at the hardware yesterday, so that will serve as a gas cap. I have yet to follow Norm's advice and build up the aluminum in the two spots which will be drilled and tapped. As suggested I'll use aluminum "welding rod" which one can solder with a propane torch. One spot will be for the fuel line and shutoff and the other will be above for an air vent. I don't know yet how I'll finally mount it, but today set it in place with a couple of little leather pads to protect the paint. It is held temporarily with a couple of zip ties. At least now I can get an idea of what it will look like. I think I like it. Maybe somebody else can use a Coleman tank on their build as well. It could also mount lengthwise on a behind the seat rack. The price was right. I paid $5.00 for the tank and another five or six dollars for the fittings. No special tools, so for some of us that's a plus.
SB
 

Attachments

silverbear

The Boy Who Never Grew Up
Jul 9, 2009
8,325
670
113
northeastern Minnesota
I was busy typing and didn't see your posts until now. I think that tapping a vent hole at the top of the end should take care of that. Shouldn't the filler tube and tank reach the same level so long as the air in the upper portion of the tank can escape?
SB
 

Kevlarr

New Member
Jul 22, 2009
1,628
4
0
Mi
Before you put a vent into the tank you could put a vent IN the tank.

Get some small copper or brass tubing, feed it through your fittings and leave a few inches sticking out either end. Spot solder the tubing inside one of your elbows to hold it in place, bend a "hook" in it where it goes into the bottle so the end of the tube is near the top of the bottle when all the fittings are in place. For purely cosmetics replace your pipe plug and female fitting with a male fitting and a brass cap with a rubber seal. Drill a hole on the center of the cap (or your plug) the same size as the tubing so it can come through the cap, slip an o-ring over the tube so it contacts the cap when it's tight. Presto, a nearly hidden tank vent and one less hole you have to make in the tank.
 

Kevlarr

New Member
Jul 22, 2009
1,628
4
0
Mi
Now that I think about it you could do almost the same thing with the fuel line, just have the copper tube come though one of the elbows and solder it in place. Put a length of fuel proof surgical tubing on the tube in the tank and a "tank clunk" (check hobby shops)on the end of the surgical tubing to keep the pickup on the bottom of the tank and you'd be set.
 

silverbear

The Boy Who Never Grew Up
Jul 9, 2009
8,325
670
113
northeastern Minnesota
Before you put a vent into the tank you could put a vent IN the tank.

Get some small copper or brass tubing, feed it through your fittings and leave a few inches sticking out either end. Spot solder the tubing inside one of your elbows to hold it in place, bend a "hook" in it where it goes into the bottle so the end of the tube is near the top of the bottle when all the fittings are in place. For purely cosmetics replace your pipe plug and female fitting with a male fitting and a brass cap with a rubber seal. Drill a hole on the center of the cap (or your plug) the same size as the tubing so it can come through the cap, slip an o-ring over the tube so it contacts the cap when it's tight. Presto, a nearly hidden tank vent and one less hole you have to make in the tank.
That's interesting, thanks for the tip. I was looking at all the fittings and saw the copper cap, but didn't think I could make it spill proof. What kind of rubber seal are you picturing? One thing I really want to be done with is the leaky gas cap. Sometimes I wonder if the cap leaks as much fuel as I burn. So the copper cap would have an O ring affixed to it for the vent tube to pass through, is that right?
SB
 

Kevlarr

New Member
Jul 22, 2009
1,628
4
0
Mi
They look like garden hose caps but you can get them in 3/4" thread, don't ask me how I know that. lol

Here's something I threw together in paint to show you what I mean.
 

Attachments

silverbear

The Boy Who Never Grew Up
Jul 9, 2009
8,325
670
113
northeastern Minnesota
Now that I think about it you could do almost the same thing with the fuel line, just have the copper tube come though one of the elbows and solder it in place. Put a length of fuel proof surgical tubing on the tube in the tank and a "tank clunk" (check hobby shops)on the end of the surgical tubing to keep the pickup on the bottom of the tank and you'd be set.
I know what you mean by the tank clunk and think I have a couple from old Tanaka friction drive motor gas tanks. I like that idea as it would help keep thinks cleaner looking and no need to tap holes in the thin aluminum and no aluminum soldering. Why couldn't the vent tube also exit out the elbow and then the cap wouldn't need an O ring for the vent line to pass though? Any reason that wouldn't work? the vent line would have to rise up to the cap height, but that could be either with flexible hose or with just a longer piece of the copper line. A copper line could follow the filler tube and even be spot soldered in a couple of spots. Then up at the cap level give it a little hook. I've been thinking about using a fire extinguisher of the same shape, but which is longer and a little bigger in diameter for my Worksman Paperboy. It fits right in there and all of what we have been talking about and working out with the Coleman tank would apply as well to a fire extinguisher. I'm talking about the red steel type which are very common. It looks like all of the nozzle fitting at the business end just unscrews. BarelyAWake said he thought it looked like it would be 1", but until one of us actually opens one up and measures it's a guess. It might be that copper fittings in 1" will work. Anyway, it is one more option for people. A tank built in to fit between cross bars would be nice, but it is beyond my skill levels as I don't weld and I don't like working with fiberglass. I also don't have a great shop to work in or even a garage for that matter, so I have to use the materials, tools and skill resources I have available to me. Lots of others are in the same boat as I am and on as tight a budget. Even so, we can be clever and come up with things within our reach. it is part of what makes a bike "ours" and something of ourselves in it makes it different and gives our builds character. I am inspired by the inventiveness of other builders... I see what others are doing such as Rockenstein with his Apple Juice Gas Tank (brilliant) and it gives the rest of us incentive to see what we can do, too. Thank you for your suggestions. They're much appreciated.
SB
SB
 

Kevlarr

New Member
Jul 22, 2009
1,628
4
0
Mi
There's no reason both couldn't exit the copper in the same place, actually if you did it that way you could put a small eye bolt in the cap and attach a little chain to it. :D
 

silverbear

The Boy Who Never Grew Up
Jul 9, 2009
8,325
670
113
northeastern Minnesota
There's no reason both couldn't exit the copper in the same place, actually if you did it that way you could put a small eye bolt in the cap and attach a little chain to it. :D
Yes, that's a good idea! No misplacing the cap if it is chained! I'm impressed. I've been thinking about all this for days as I fiddled with it and in just a few minutes you've come up with all of these improvements. I think it's great being part of this forum and appreciate all of the sharing. I have learned so much from you good people. Many thanks.
SB